Only  $9.9! Get 50,000 minutes with our Starter Plan, perfect for your MVP project.
Only $9.9! Get 50,000 minutes with our Starter Plan, perfect for your MVP project.
Grab It Now 
Conference
Overview
  • Web
    • Integration
    • UI Customization
    • In-Conference Chat
    • Cloud Recording
    • API Documentation
      • RoomKit API
      • RoomEngine API
        • API Overview
        • TUIRoomEngine
        • TUIRoomEvents
        • TUIRoomEngine Defines
    • FAQs
  • iOS
    • Integration
    • UI Customization
    • Conference Control
    • In-Conference Chat
    • Cloud Recording
    • API Documentation
      • RoomKit API
      • RoomEngine API
        • API Overview
        • TUIRoomEngine
        • TUIRoomObserver
        • Type Definition
    • FAQs
  • Android
    • Integration
    • UI Customization
    • Conference Control
    • In-Conference Chat
    • Cloud Recording
    • API Documentation
      • RoomKit API
      • RoomEngine API
        • API Overview
        • TUIRoomEngine
        • TUIRoomObserver
        • Type Definition
    • FAQs
  • Electron
    • Integration
    • UI Customization
    • In-Conference Chat
    • Cloud Recording
    • API Documentation
      • RoomKit API
      • RoomEngine API
        • API Overview
        • TUIRoomEvent
        • TUIRoomEngine
        • TUIRoomEngine Defines
    • FAQs
  • Flutter
    • Integration
    • UI Customization
    • Conference Control
    • Cloud Recording
    • API Documentation
      • RoomKit API
      • RoomEngine API
        • API Overview
        • TUIRoomEngine
        • TUIRoomObserver
        • Type Definition
    • FAQs
  • Overview
    • Overview
  • Activate the Service
  • Pricing
    • TRTC Conference Monthly Packages
    • Pay-As-You-Go
    • Free Minutes
  • Error Code
Conference

Integration

This article will introduce how to complete the integration of the TUIRoomKit Component in the shortest time. By following this document, you will complete the following key steps within an hour and ultimately obtain an audio/video conference function with a complete UI interface.

Environment preparation

iOS 13.0 and higher.
Xcode 12.0 and higher.
Swift 4.2 and higher.

Step 1: Activate the service

Before initiating a meeting with TUIRoomKit, you need to activate the exclusive multi-person audio and video interaction service for TUIRoomKit on the console. For specific steps, please refer to Activate Service.

Step 2: Integrate the TUIRoomKit Component

1. Add the following dependencies to your Podfile file.
pod 'TUIRoomKit'
2. Execute the following command to install the Component.
pod install
Note: If you cannot install the latest version of TUIRoomKit, execute the following command to update the local CocoaPods repository list.
pod repo update

Step 3: Project Configuration

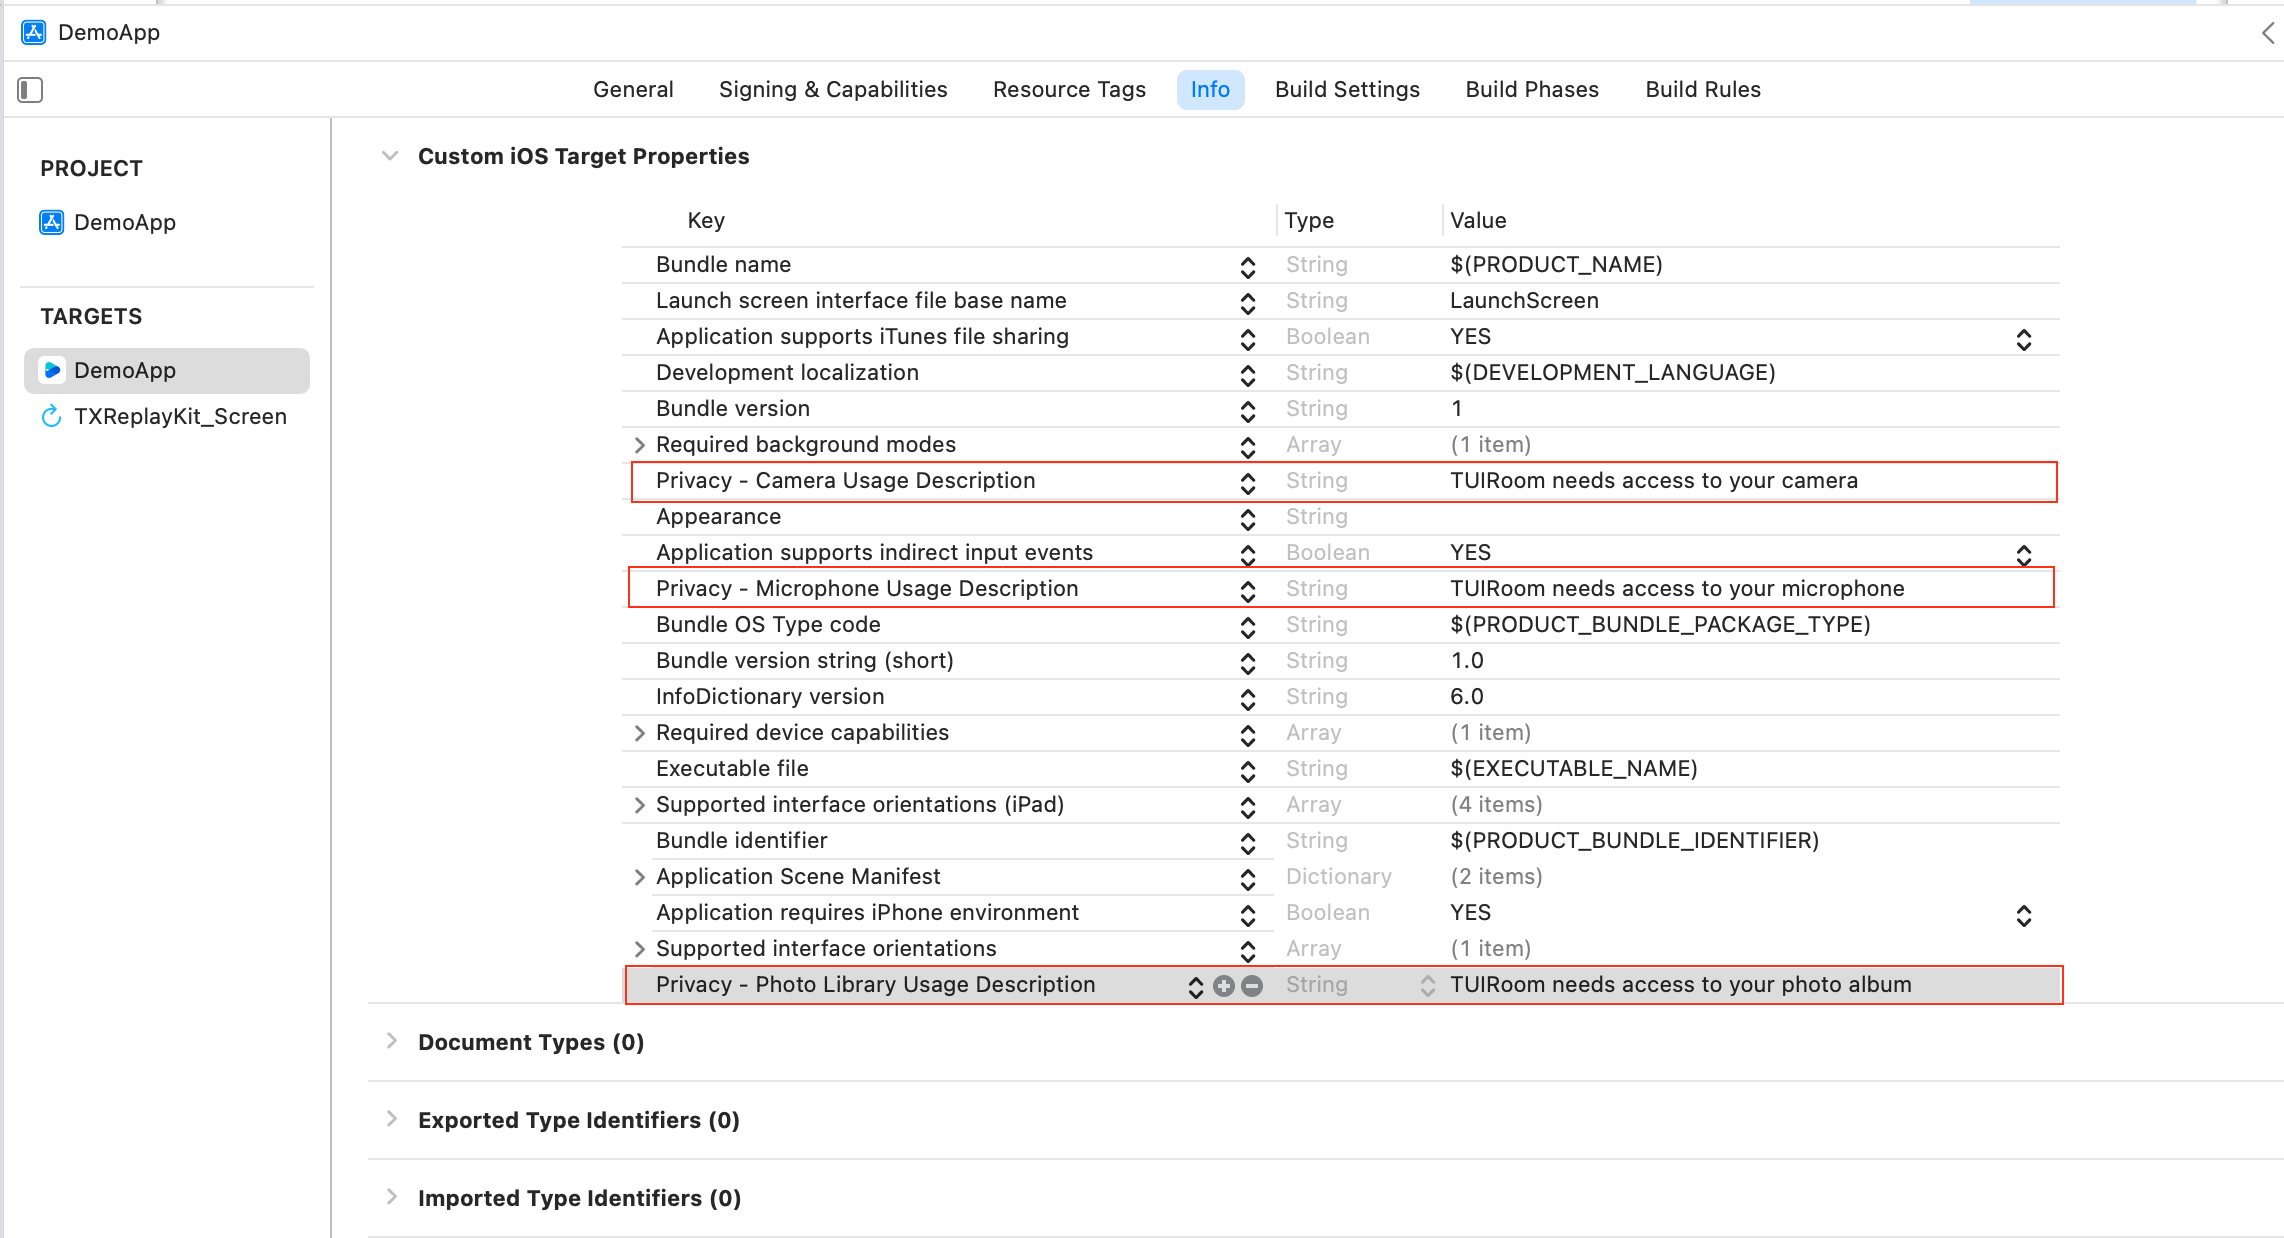
To use the audio and video functions, you need to authorize the use of microphone, camera and photo album. Add the following items to the App's Info.plist, corresponding to the prompt messages for the microphone, camera, and photo album when the system pops up the authorization dialog box.
<key>NSCameraUsageDescription</key>
<string>TUIRoom needs access to your Camera permission</string>
<key>NSMicrophoneUsageDescription</key>
<string>TUIRoom needs access to your Mic permission</string>
<key>NSPhotoLibraryUsageDescription</key>
<string>TUIRoom needs access to your Photo Library</string>


Step 4: Log in

Add the following code to your project. Its function is to complete the initialization of TUI components by calling the relevant interfaces in TUICore. This step is very critical, because all functions of TUIRoomKit can only be used normally after successful login, so please be patient and check whether the relevant parameters are configured correctly:
Swift
OC
import TUICore

TUILogin.login(1400000001, // Please replace with the SDKAppID obtained in step 1
userID: "998", // Please replace with your UserID
userSig: "xxxxxxxxxx") { // You can calculate a UserSig in the Console and fill it in this position
print("login success")
} fail: { (code, message) in
print("login failed, code: \(code), error: \(message ?? "nil")")
}
#import "TUICore/TUILogin.h"

[TUILogin login:1400000001 // Please replace with the SDKAppID obtained in step 1
userID:@"998" // Please replace with your UserID
userSig:@"xxxxxxxxxx" succ:^{ // You can calculate a UserSig in the Console and fill it in this position
NSLog(@"login,success");
} fail:^(int code, NSString * _Nullable msg) {
NSLog(@"login,failed,code:%d,msg:%@",code,msg);
}];
Parameter Description Here is a detailed introduction to the key parameters used in the login function:
SDKAppID:You have already obtained it in Activate the service, so it will not be repeated here.
UserID:The ID of the current user, string type, only allows to contain English letters (a-z and A-Z), numbers (0-9), hyphens (-), and underscores (_).
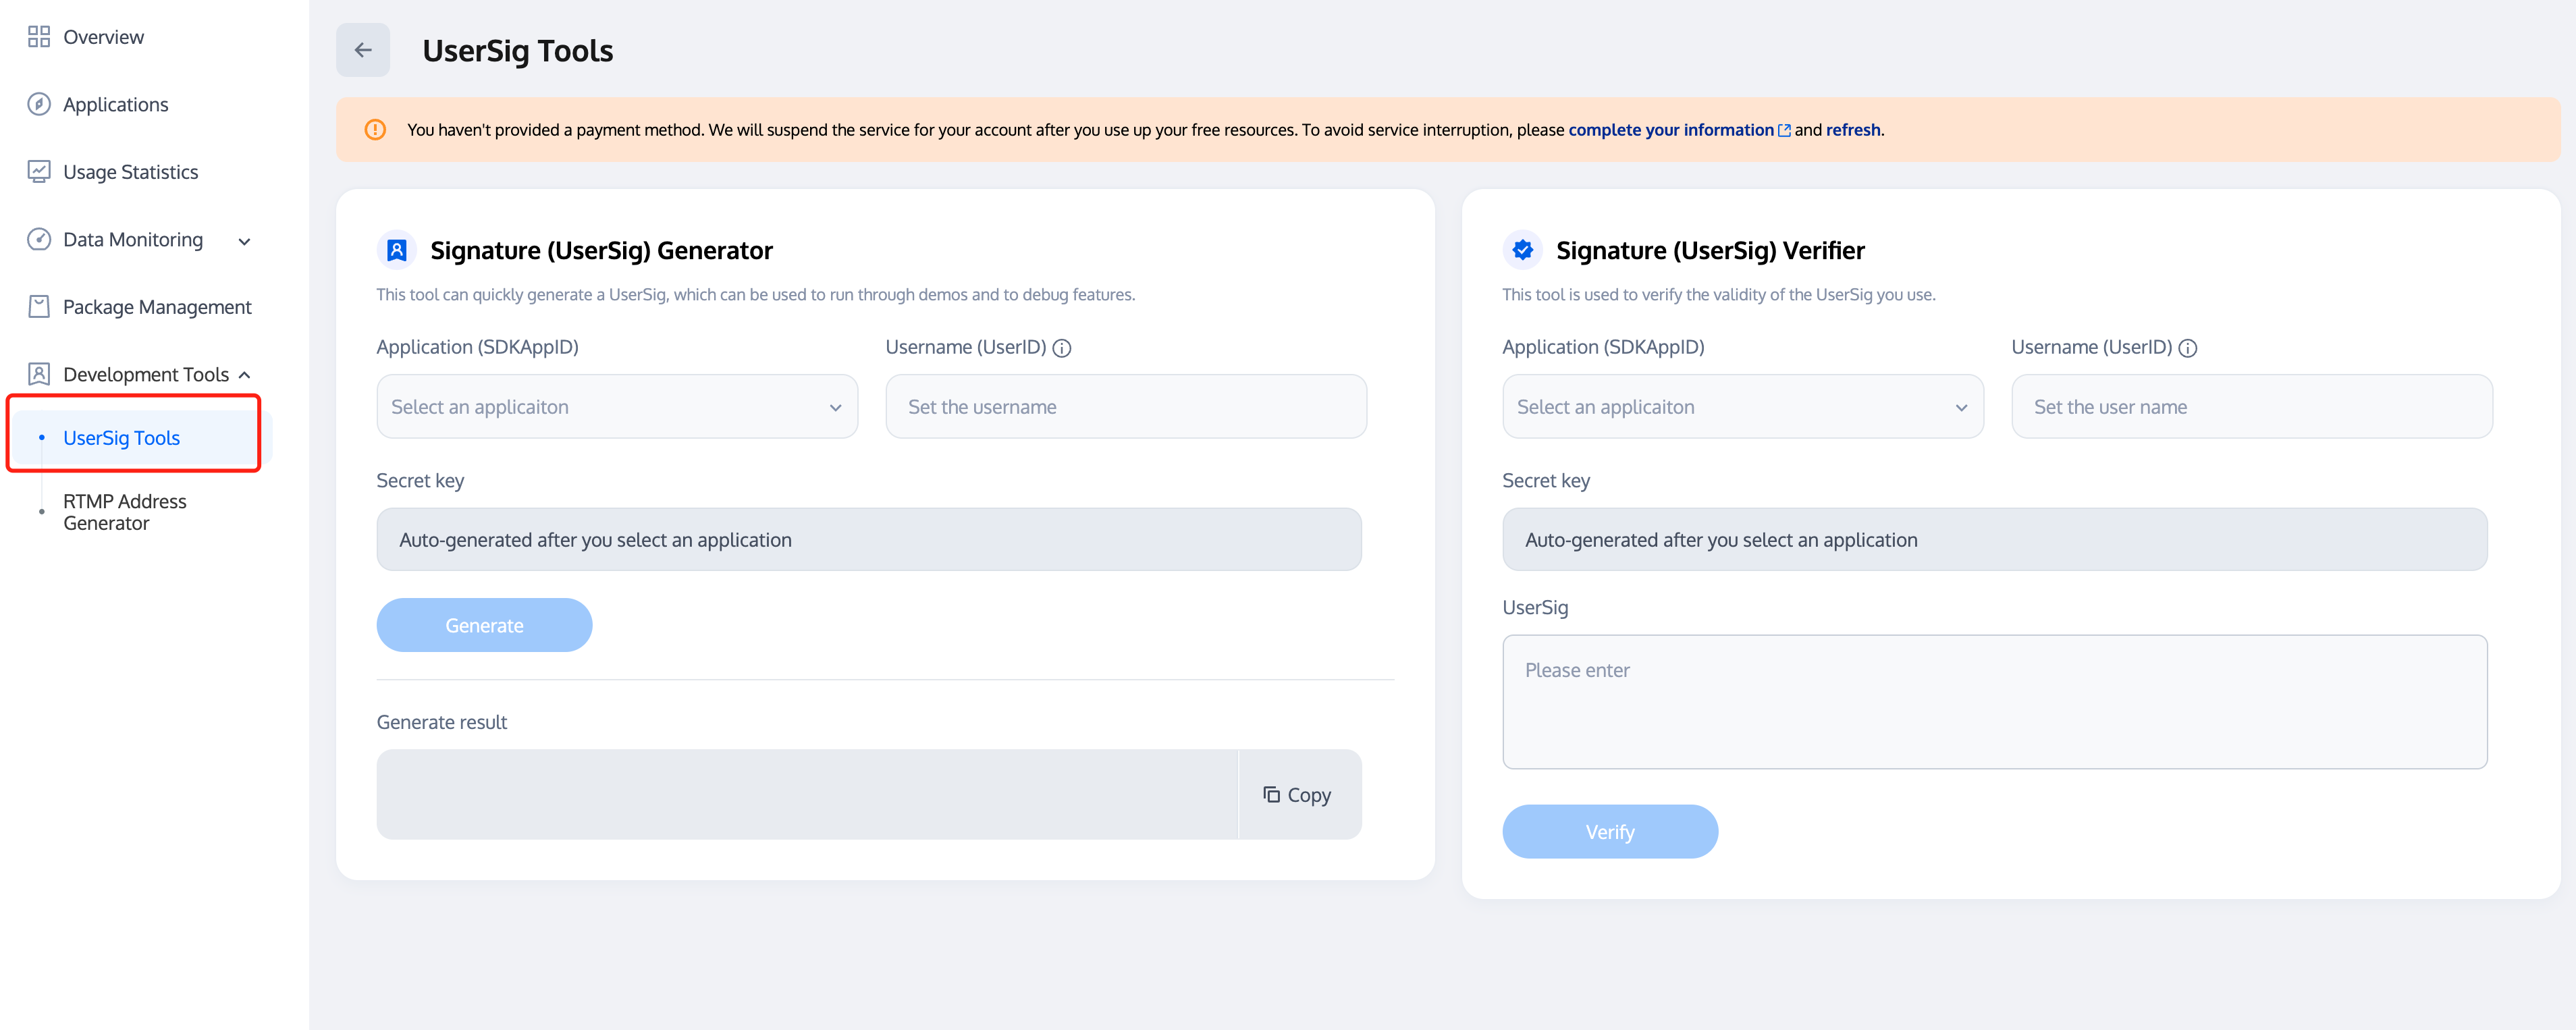
UserSig:Encrypt the SDKAppID, UserID, etc. with the SDKSecretKey obtained in Activate the service to get the UserSig, which is a ticket for authorization and is used for Tencent Cloud to recognize whether the current user can use the TRTC service. You can create a temporarily available UserSig through the UserSig Tools through the project sidebar in the console.


For more information, please refer to the UserSig related.

Step 5: The host start a quick conference

The main conference page is ConferenceMainViewController. Just call quickStartConference to initiate a quick conference and jump to ConferenceMainViewController in the onConferenceStarted callback.
Swift
OC
import TUIRoomKit

// CreateConferenceViewController is your own ViewController.
class CreateConferenceViewController: UIViewController {
private var conferenceViewController: ConferenceMainViewController?
func quickStartConferenceAction() {
conferenceViewController = ConferenceMainViewController()
let params = ConferenceParams() // The setting of params is optional, including microphone, camera and other status.
params.isMuteMicrophone = false
params.isOpenCamera = false
conferenceViewController?.setConferenceParams(params: params)
conferenceViewController?.setConferenceObserver(observer: self)
conferenceViewController?.quickStartConference(conferenceId: "123456")
}
}
extension CreateConferenceViewController: ConferenceObserver {
func onConferenceStarted(conferenceId: String, error: ConferenceError) {
if error == .success, let vc = conferenceViewController {
navigationController?.pushViewController(vc, animated: true)
}
conferenceViewController = nil
}
}
// CreateConferenceViewController is your own ViewController.
@interface CreateConferenceViewController ()<ConferenceObserver>
@property(strong, nonatomic) ConferenceMainViewController * conferenceController;
@end

@implementation CreateConferenceViewController

- (void)quickStartConferenceAction {
_conferenceController = [[ConferenceMainViewController alloc]init];
ConferenceParams * params = [[ConferenceParams alloc]init]; // The setting of params is optional, including microphone, camera and other status.
params.isMuteMicrophone = false;
params.isOpenCamera = false;
[_conferenceController setConferenceParamsWithParams:params];
[_conferenceController setConferenceObserverWithObserver:self];
[_conferenceController quickStartConferenceWithConferenceId:@"123456"];
}

- (void)onConferenceStartedWithConferenceId:(NSString *)conferenceId error:(enum ConferenceError)error {
if (error == ConferenceErrorSuccess) {
[self.navigationController pushViewController:_conferenceController animated:true];
}
_conferenceController = nil;
}
@end

Step 6: Members join the conference

The main conference page is ConferenceMainViewController. Just call joinConference to join the conference and jump to ConferenceMainViewController in the onConferenceJoined callback.
Swift
OC
import TUIRoomKit

// EnterConferenceViewController is your own ViewController.
class EnterConferenceViewController: UIViewController {
private var conferenceViewController: ConferenceMainViewController?
private func joinConferenceAction() {
conferenceViewController = ConferenceMainViewController()
let params = ConferenceParams() // The setting of params is optional, including microphone and camera status.
params.isMuteMicrophone = false
params.isOpenCamera = false
conferenceViewController?.setConferenceParams(params: params)
conferenceViewController?.setConferenceObserver(observer: self)
conferenceViewController?.joinConference(conferenceId: "123456")
}
}
extension EnterConferenceViewController: ConferenceObserver {
func onConferenceJoined(conferenceId: String, error: ConferenceError) {
if error == .success, let vc = conferenceViewController {
navigationController?.pushViewController(vc, animated: true)
}
conferenceViewController = nil
}
}
// EnterConferenceViewController is your own ViewController.
@interface EnterConferenceViewController ()<ConferenceObserver>
@property(strong, nonatomic) ConferenceMainViewController * conferenceController;
@end

@implementation EnterConferenceViewController

- (void)joinConferenceAction {
_conferenceController = [[ConferenceMainViewController alloc]init];
ConferenceParams * params = [[ConferenceParams alloc]init]; // The setting of params is optional, including microphone and camera status.
params.isMuteMicrophone = false;
params.isOpenCamera = false;
[_conferenceController setConferenceParamsWithParams:params];
[_conferenceController setConferenceObserverWithObserver:self];
[_conferenceController joinConferenceWithConferenceId:@"123456"];
}

- (void) onConferenceJoinedWithConferenceId:(NSString *)conferenceId error:(enum ConferenceError)error {
if (error == ConferenceErrorSuccess) {
[self.navigationController pushViewController:_conferenceController animated:true];
}
_conferenceController = nil;
}
Note: When using OC for access, TUIRoomKit needs to be imported into the bridge file.
#import <TUIRoomKit/TUIRoomKit-Swift.h>


Conference main interface


User list

Common Problems

If you encounter problems when using TUIRoomKit, please check the FAQ document first.

Suggestions and Feedback

If you have any suggestions or feedback, please contact info_rtc@tencent.com.