Only  $9.9! Get 50,000 minutes with our Starter Plan, perfect for your MVP project.
Only $9.9! Get 50,000 minutes with our Starter Plan, perfect for your MVP project.
Grab It Now 
Beauty AR
Overview
  • Web
    • Quick Start
    • Integration
      • Overview
      • Built-in Camera
      • Custom Stream
      • Loading Optimization
      • Configuring Effects
      • Configuring Segmentation
      • Configuring Animojis and Virtual Avatars
    • API Document
    • Release Notes
    • Best Practices
      • Publishing over WebRTC
      • Publishing over WebRTC (Preinitialization)
      • Publishing Using TRTC
    • FAQs
  • Android
    • Integration
      • Integrating SDK
      • Integrating TEBeautyKit
    • API Document
    • Release Notes
    • Best Practices
      • Reducing SDK Size
      • Effect Parameters
    • Advanced Capabilities
      • Gesture Recognition
      • Face Recognition
      • Virtual Background
    • Material Production
      • Beauty AR Studio Introduction
    • FAQs
  • IOS
    • Integration
      • Integrating SDK
      • Integrating TEBeautyKit
    • API Document
    • Release Notes
    • Best Practices
      • Reducing SDK Size
      • Effect Parameters
    • Advanced Capabilities
      • Gesture Recognition
      • Face Recognition
      • Virtual Background
    • Material Production
      • Beauty AR Studio Introduction
    • FAQs
  • Flutter
    • Integration
    • API Document
    • Material Production
      • Beauty AR Studio Introduction
  • Overview
    • Overview
  • Activate the Service
  • Pricing
  • Free Trial
    • Web
    • Mobile
Beauty AR

Overview

This document describes how to quickly and securely connect to Beauty AR Web and use its features. If you have any questions, please contact us

Preparations

Before connecting to the SDK, make sure you have purchased a web license and created a project as instructed in Activate the Service.

Getting parameter information

1. Getting the license key and token from License Management


Web Domain: The domain information entered during project creation. The license can be used only under this domain.
Note:
Be sure to use the license key and token that match the developed domain, otherwise authentication will fail, and the SDK cannot be properly initialized.
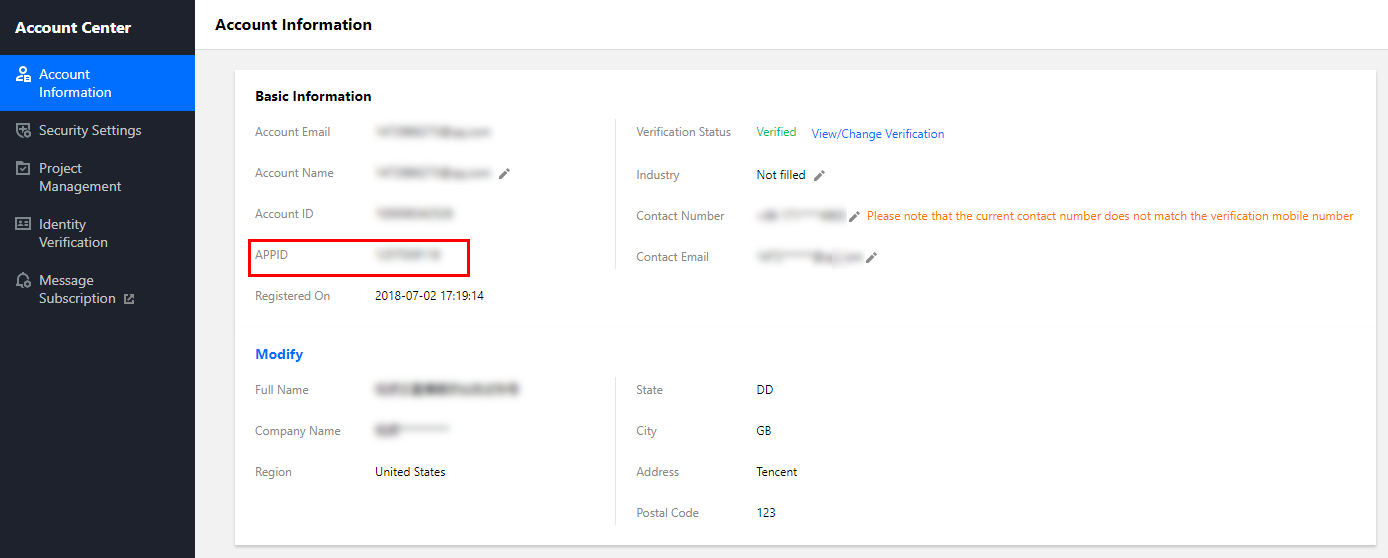
2. Getting the APPID
Log in to the Tencent Cloud console and go to Account Info > Basic Info to view the APPID.


Preparing signing information

In addition to the license key that is needed to authorize the SDK, you also need to use the token to sign the APIs called in the SDK.

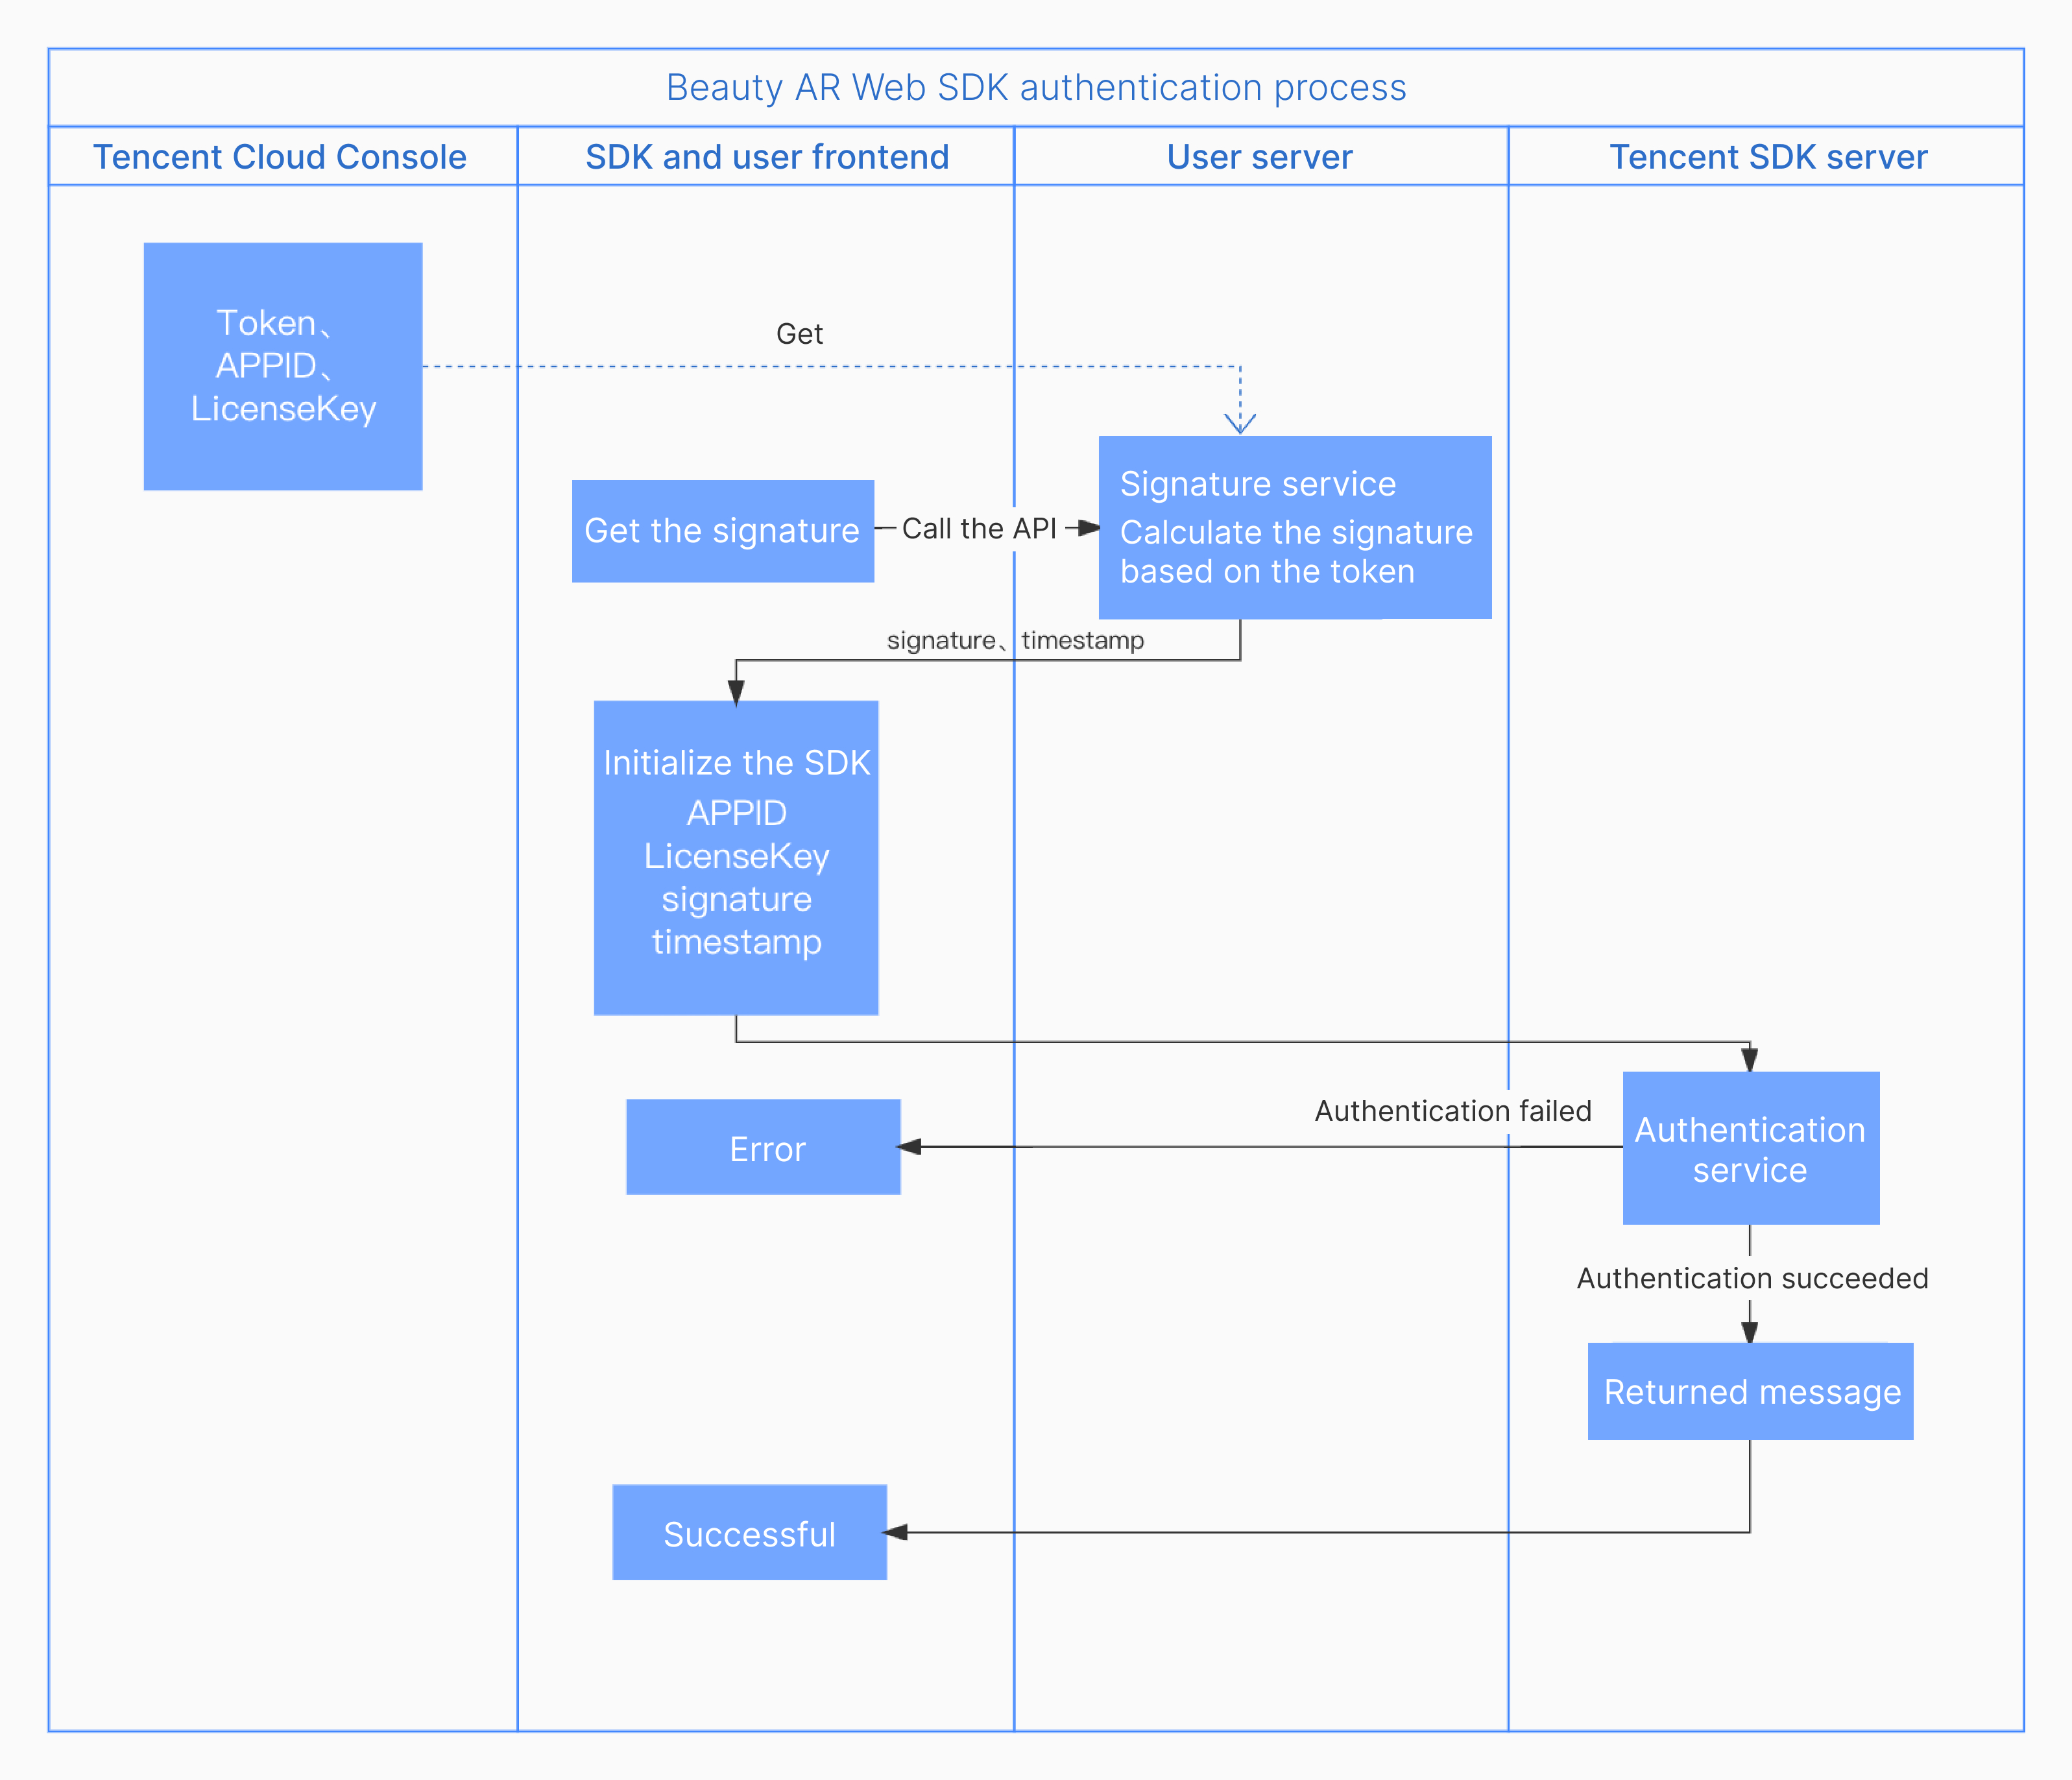
Signature algorithm authentication process


Token: Your unique ID, which is used to sign SDK APIs.
App ID: The APPID displayed in Account Info > Basic Info in the Tencent Cloud console.
Timestamp: The current time accurate to the second (10 digits). 
Signature: The signature used for signing, which expires after five minutes.

Deploying a signature service

Because the signature expires after a given time, and to prevent the token from being leaked, you need to deploy a signature generation service.
Note:
If the token is leaked, your identity will be stolen, which will lead to your resources also being leaked.
If the signature generation method is implemented on the frontend, the token may be leaked. Therefore, to safeguard your security, we recommend that you do not implement signature generation on the frontend.
// Taking the `express` backend as an example,
// Signature algorithm: sha256(timestamp+token+appid+timestamp)

const { createHash } = require('crypto');
const config = {
appid: 'Your Tencent Cloud `APPID`',
token: 'Your token',
}
const sha256 = function(str) {
return createHash('sha256')
.update(str)
.digest('hex');
}

const genSignature = function() {
const timestamp = Math.round(new Date().getTime() / 1000);
const signature = sha256(timestamp + config.token + config.appid + timestamp).toUpperCase(); // Use the token and APP ID obtained above to generate an encrypted string and return it
return { signature, timestamp };
}

app.get("/get-ar-sign", (req, res) => {
const sign = genSignature();
res.setHeader('Access-Control-Allow-Origin','*');
res.setHeader('Access-Control-Allow-Methods', 'GET, OPTIONS');
res.send(sign);
})

Calling the signature service on the frontend

After deploying the signature service, add a signature acquisition method to your webpage for the SDK to connect to and call.
Web
Mini program
async function getSignature() {
const res = await fetch('Your domain/get-ar-sign')
const authdata = await res.json()
console.log('authdata',authdata)
return authdata
}
async function getSignature() {
return new Promise((resolve,reject)=>{
wx.request({
url: 'Your domain/get-ar-sign',
method: 'GET',
success(res) {
console.log('getSignature ok', res)
resolve(res.data);
},
fail(e){
console.log('getSignature error', e)
}
})
})
}

SDK Integration

After completing the above preparations, follow the process below to connect to and use the SDK.
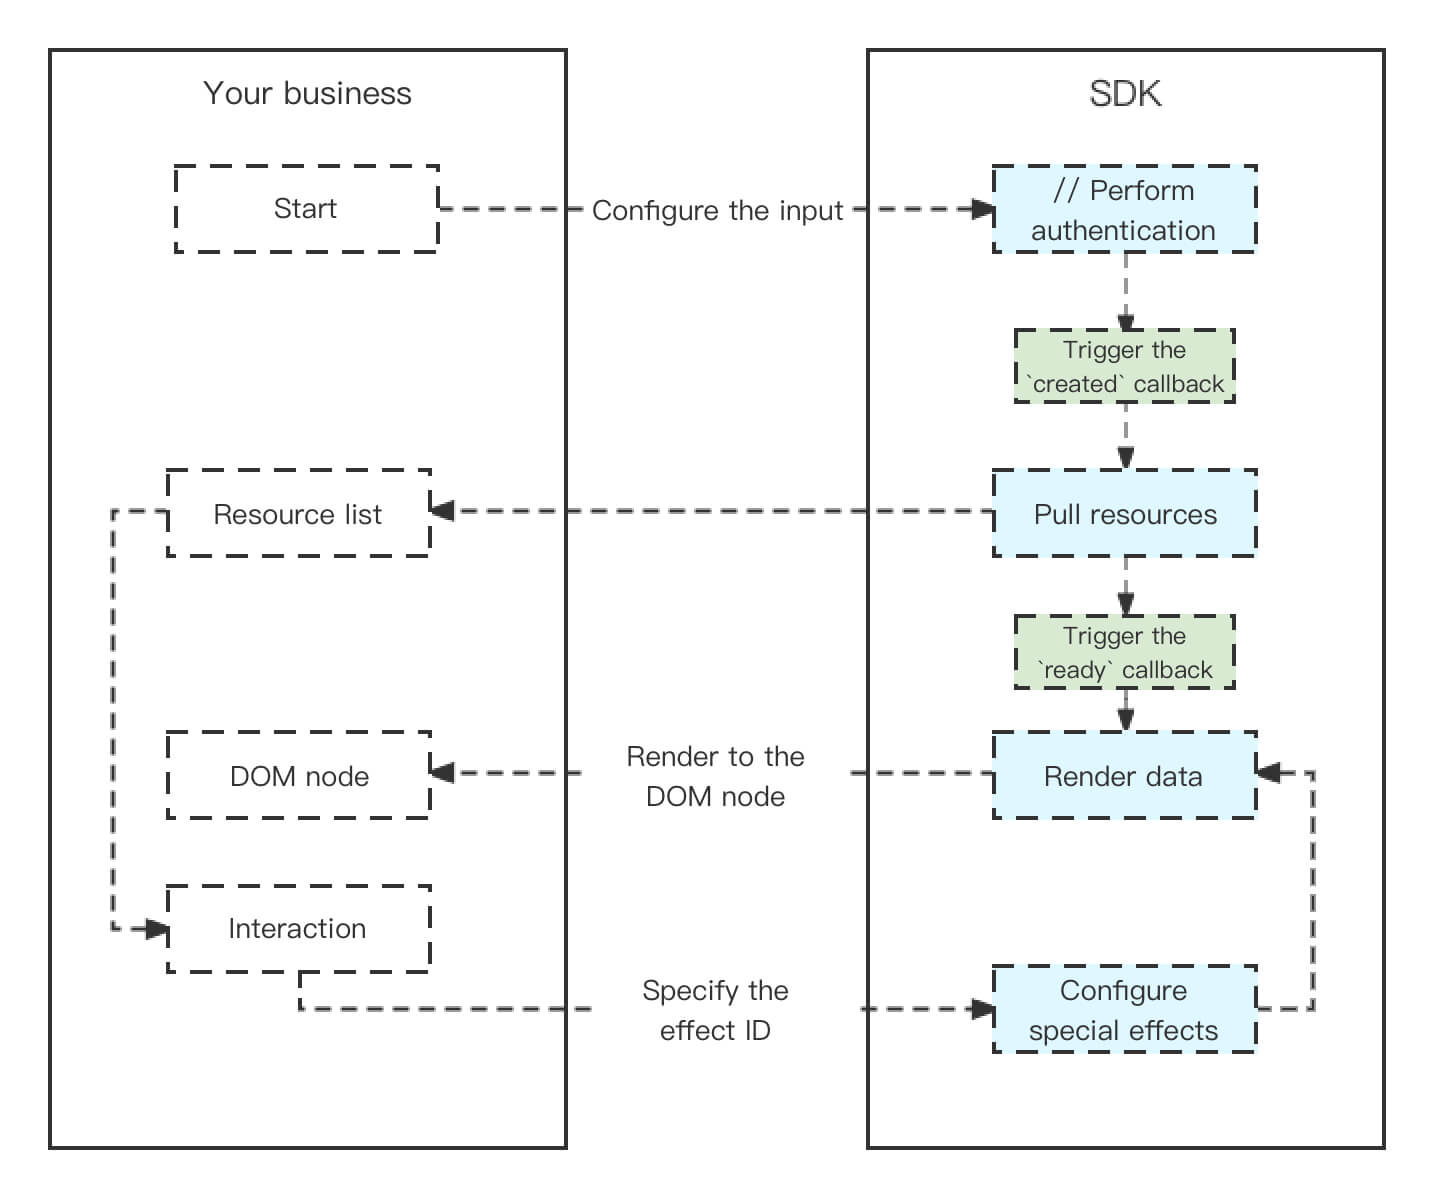
Process description

The Tencent Effect web SDK offers simple and minimally invasive APIs. To integrate it and use its features, you only need to initialize an instance and add the render node to your webpage.


Installing the SDK

The SDK is offered as an npm package.
npm install tencentcloud-webar
In addition, you can also use it for your project by importing JS.
<script charset="utf-8" src="https://webar-static.tencent-cloud.com/ar-sdk/resources/latest/webar-sdk.umd.js"></script>

Initializing the SDK

For web integration, we offer two initialization modes for the SDK.
Built-in camera and player: The device's built-in camera and player are used. API calls are easy and fast, with rich interactive features.
Custom streams: You can use this mode if you want to apply effects to your own streams or want greater flexibility and control.

Using the SDK

Configuring beauty filters and special effects
For more information, see Configuring Filters and Effects.
Segmentation
The keying feature allows you to segment and change the background in the image. For details, see Configuring Segmentation.
3D effects
For more information, see Configuring Filters and Effects.
Animojis and virtual avatars
This capability relies on a WebGL2 environment. For more information, see Configuring Animojis and Virtual Avatars.

Parameters and APIs

Sample Code