Two Steps, One Day! Effortlessly Implement Multi-terminal Adaptation Chat Apps with Tablet Integration using Flutter Chat UIKit
Challenges: low latency, high availability, cross-platform compatibility
The digital landscape is a challenging terrain for developers aiming to create real-time, interactive products. The need for low latency, high availability, and cross-platform compatibility is paramount. With a myriad of devices - from smartphones and tablets to desktops and IoT screens - it's a daunting task to provide a uniform, high-performance chat experience across all platforms.
Traditionally, developers have had to invest substantial time and energy to individually tailor their applications for each device and platform. Web-based solutions, while offering a quick fix for multi-platform deployment, often compromise on performance and user experience.
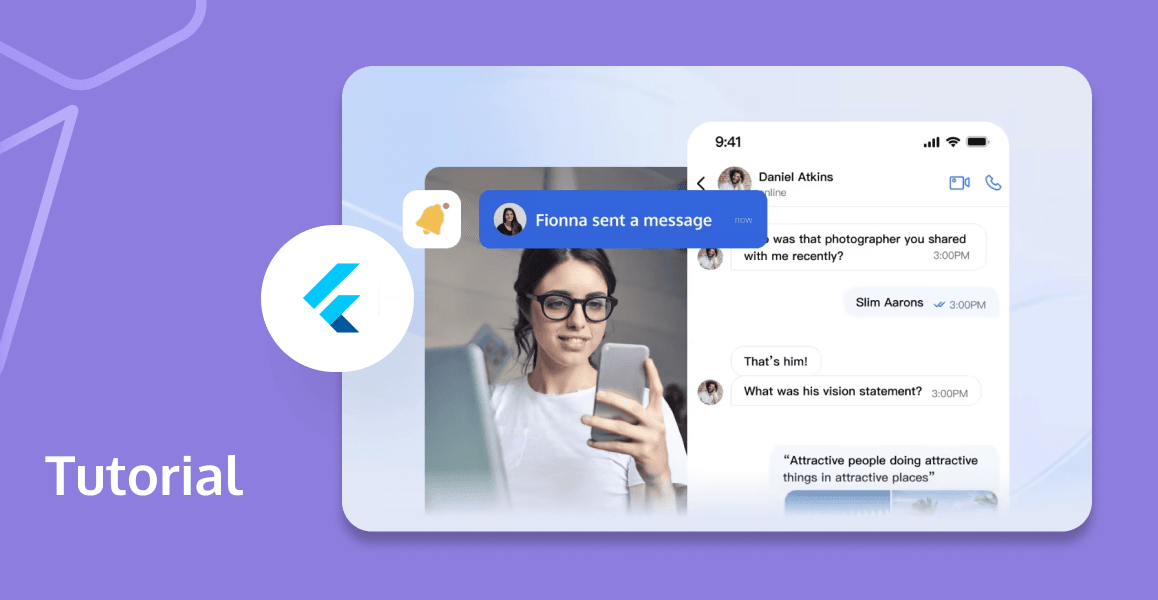
But now, with the advent of Flutter's multi-platform capabilities, developers can breathe a sigh of relief. The ability to develop comprehensive applications that deliver near-native performance across all platforms is no longer a distant dream. That is why we're thrilled to unveil our latest offering - the Flutter Chat UIKit.
What sets our UIKit apart?
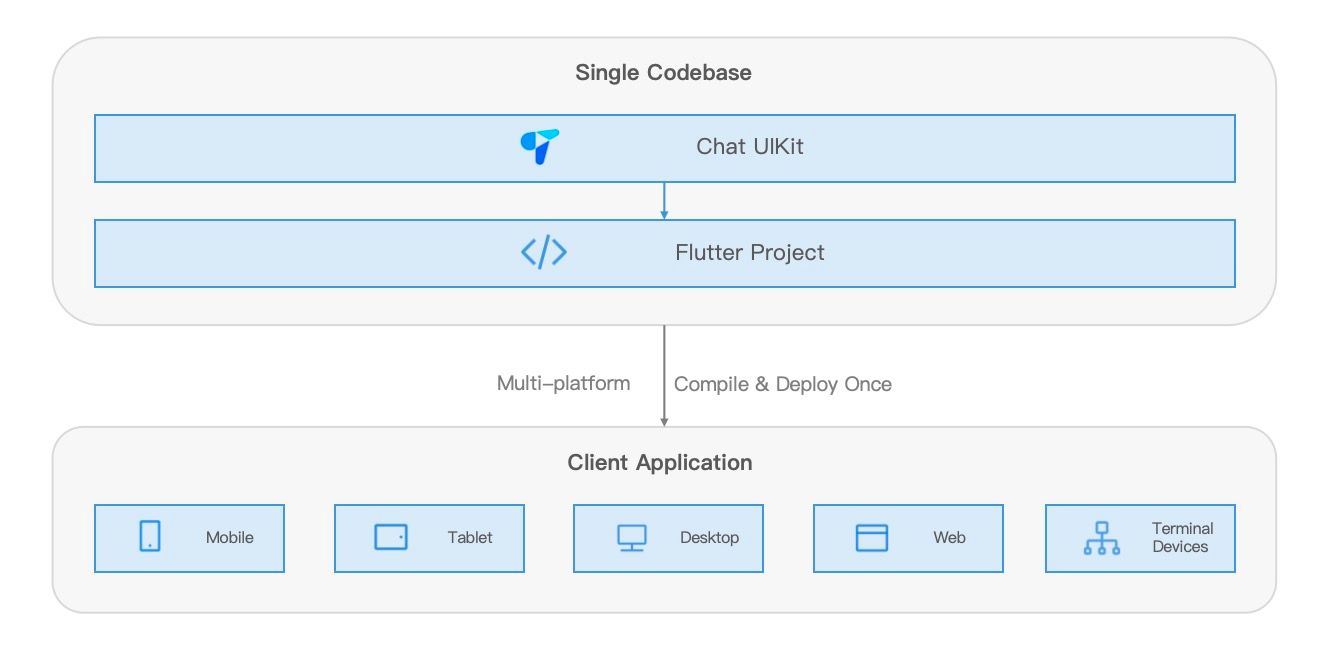
1. Cross-Platform Compatibility
- Tablet embedded settings support
- Seamless integration with single codebase in just two steps for streamlined development
- Full platform(mobile, tablet, desktop, and web)support
2. The industry's first to support IoT terminals
- Flexible in controlling smart IoT products, such as central control panels in smart home systems
- Streamlined operation logic for embedded terminal devices
- The ability to facilitate cross-terminal chat communication and real-time, ultra-low latency control of IoT devices using signaling messages for effective devices management
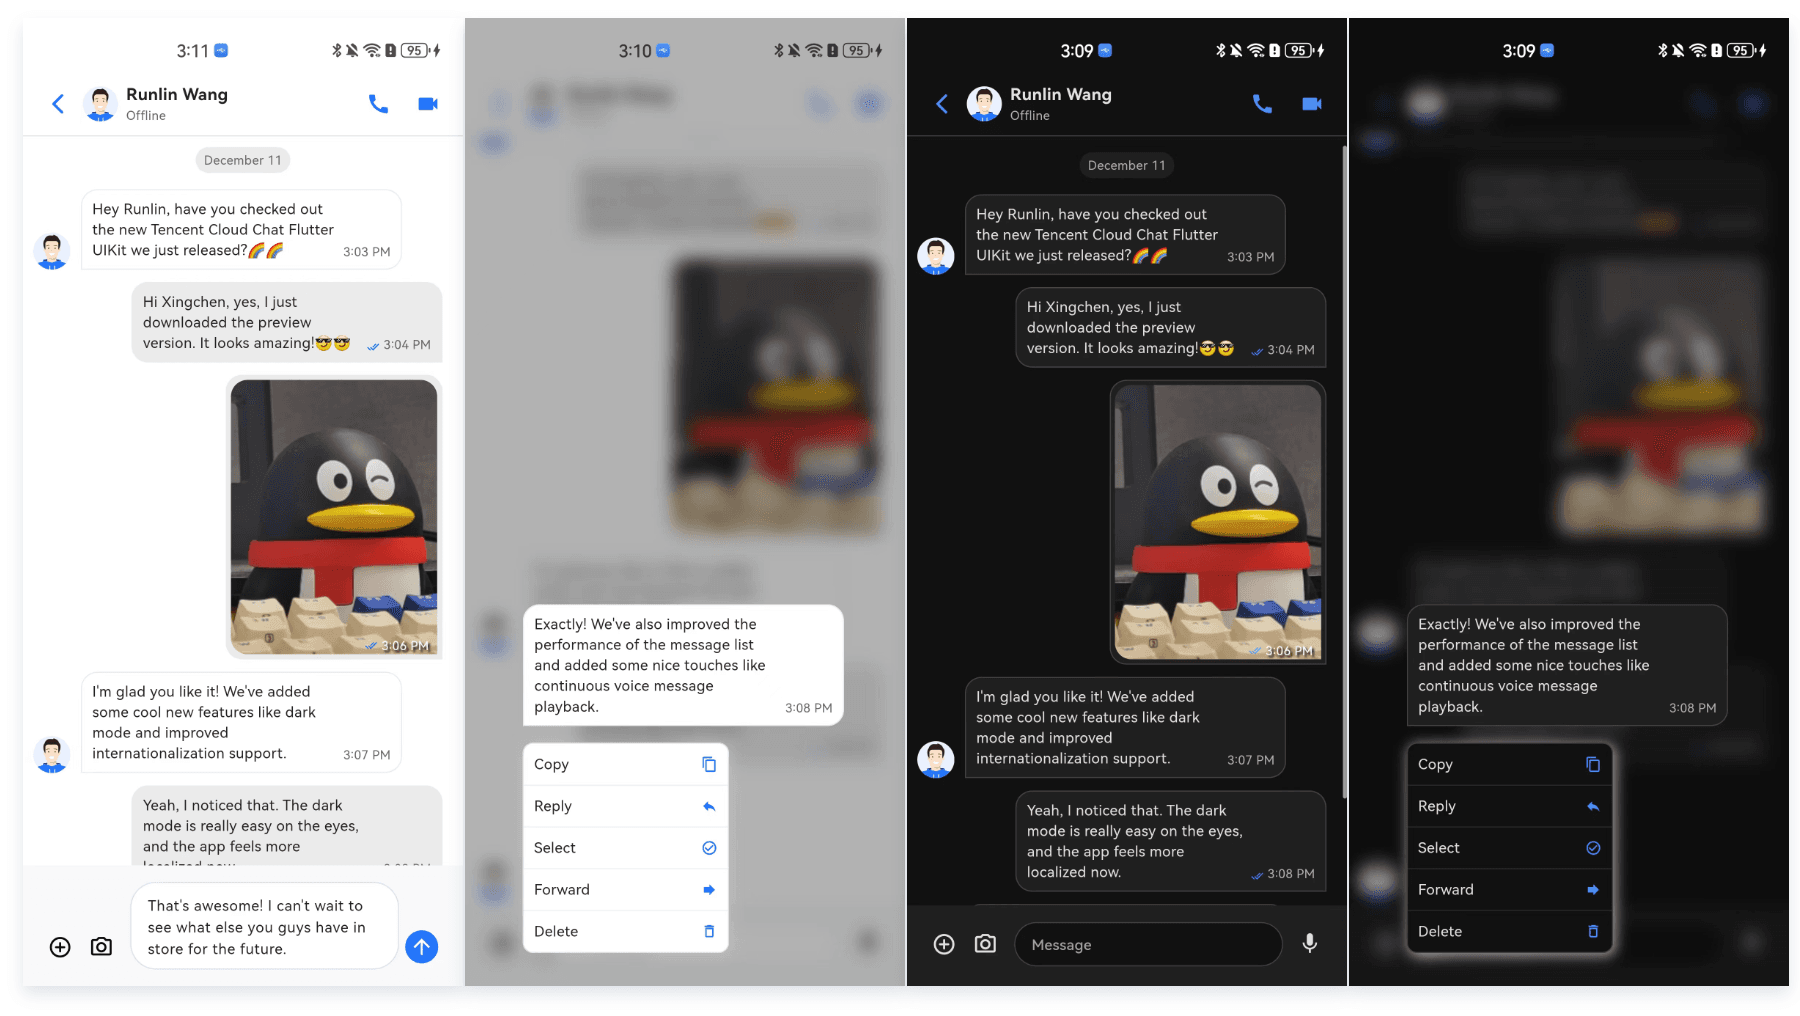
3. Customizable UI Components
- Conversation, Message, Contact, Voice / Video Calls, etc.
- Theme customization options with Dark and Light modes supports.
- Comprehensive chat capabilities along with delightful user experience features, like rich animations, haptic feedback and modern design.
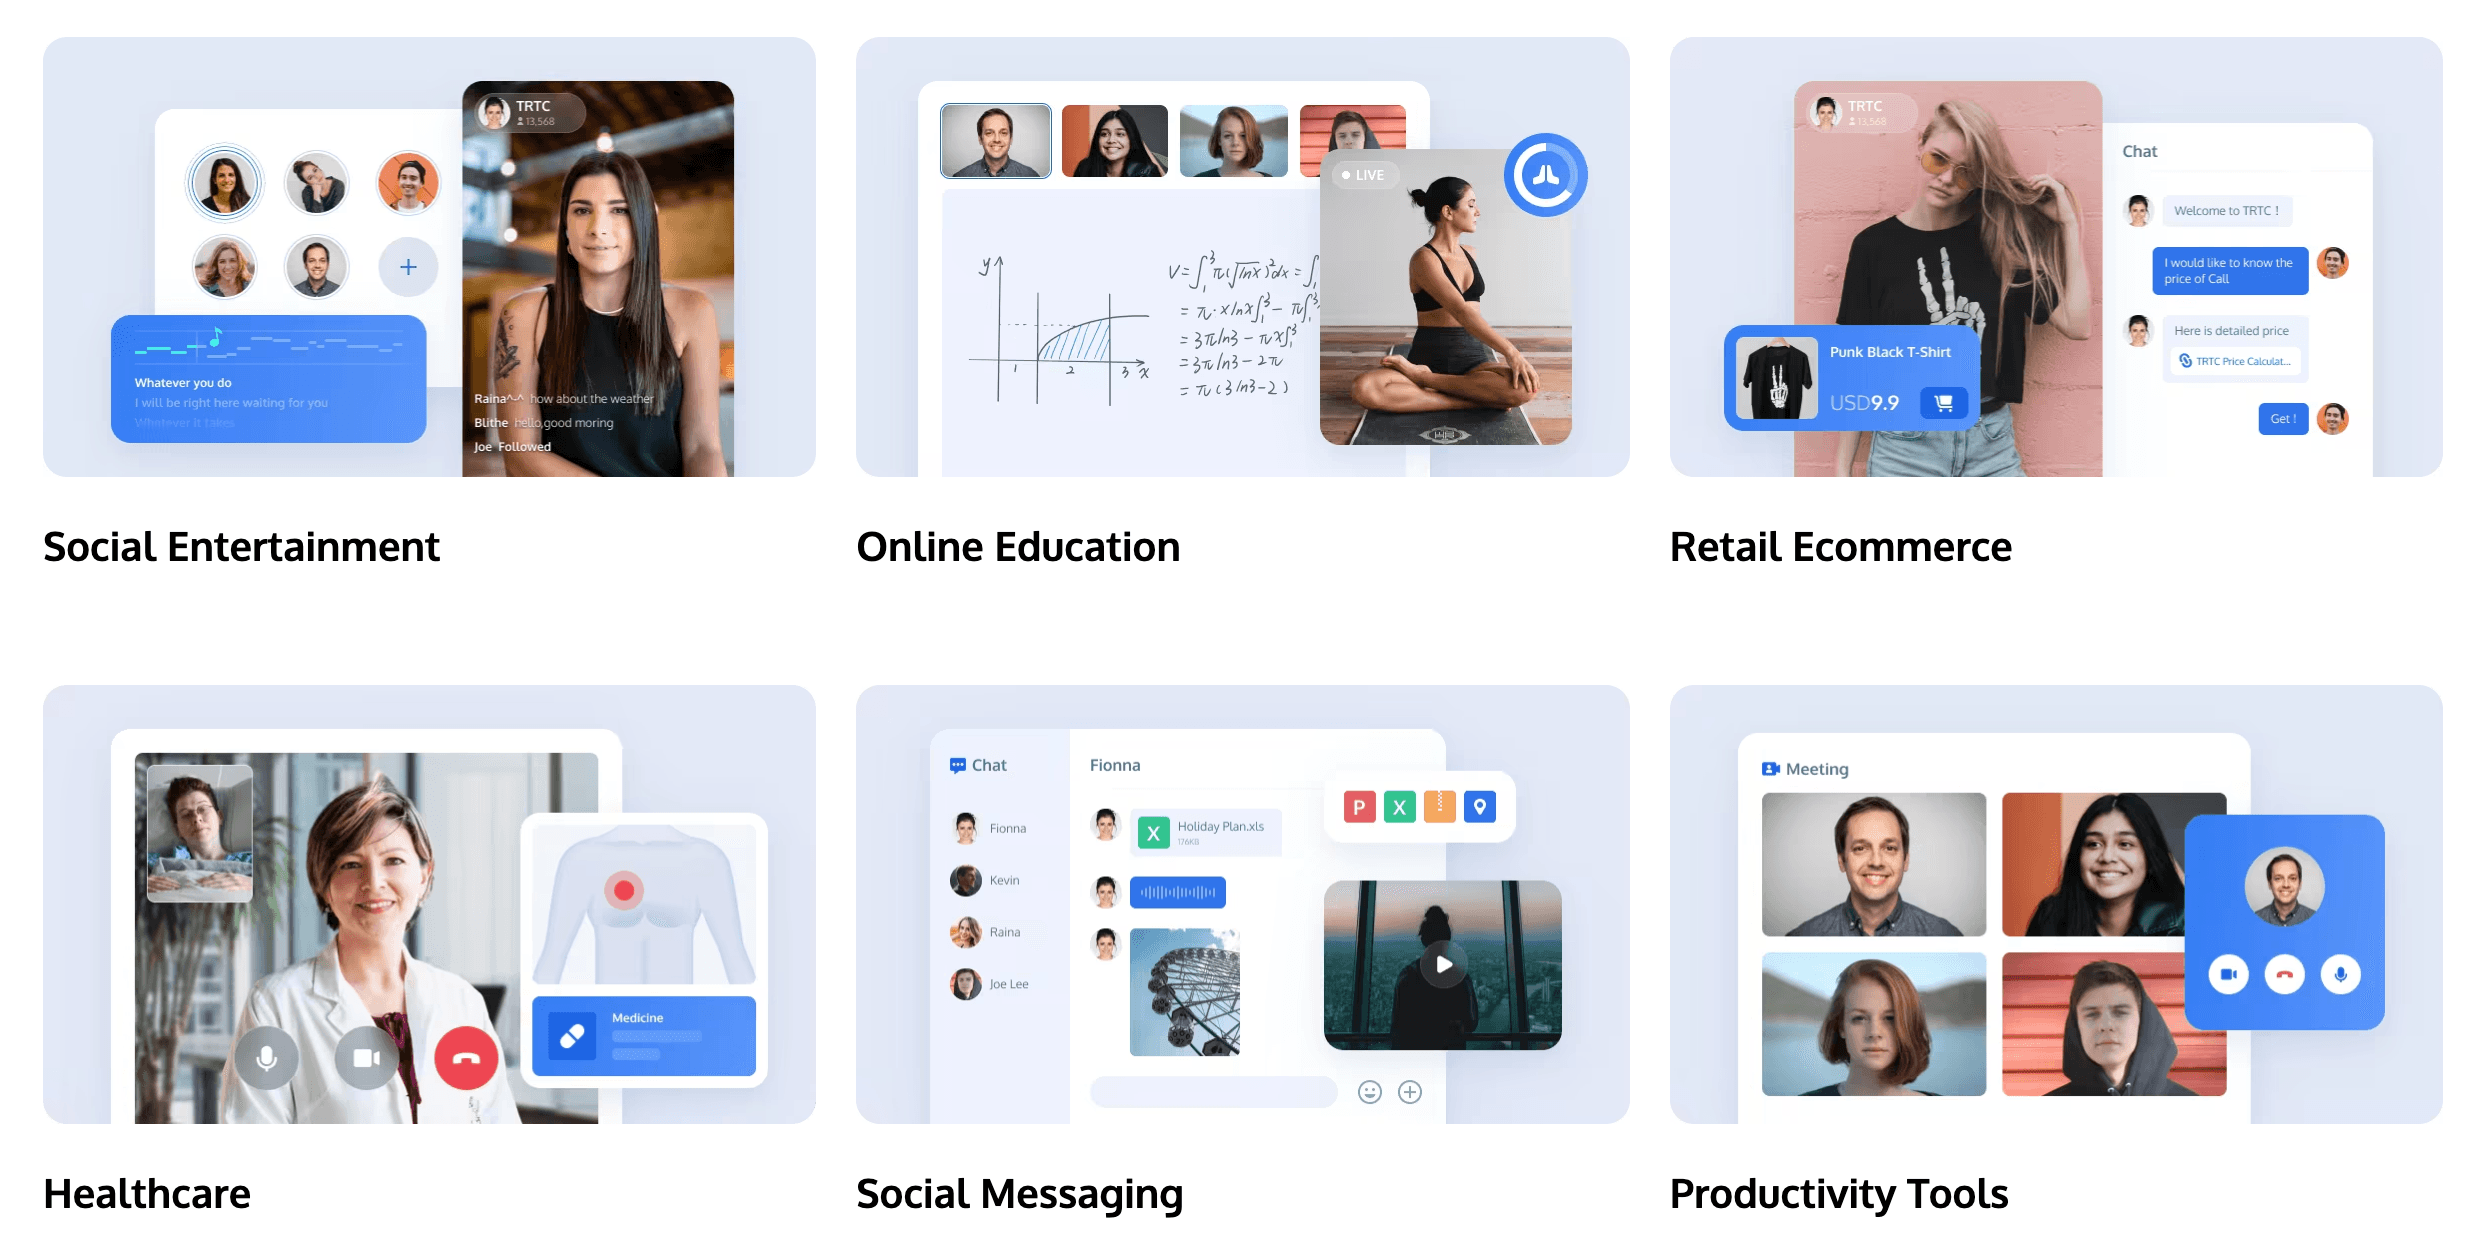
4. Versatile Applications
5. Wide-reaching Global Deployment
- Optimized for networks in 200+ countries
- Support for multiple languages(English, Arabic, Japanese, Korean, Chinese, with supports to add more)
6. Reliable Audio/Video
- Under 300 ms latency
- 100% sending success rate in a 60% weak network packet loss situation
7. Designed with Developers in Mind
- Selective importing of components, modular packages, with auto-navigation supports
- Streamlined component parameter design
- Global and component instances level management
- Clear code naming conventions and detailed comments
Besides, you can explore our comprehensive demo on GitHub Repo for a more direct and immersive experience.
Effortless Integration: Get Started with Our Flutter Chat UIKit
Setting Up Your Application in the Console
Let's begin with the Console operations:
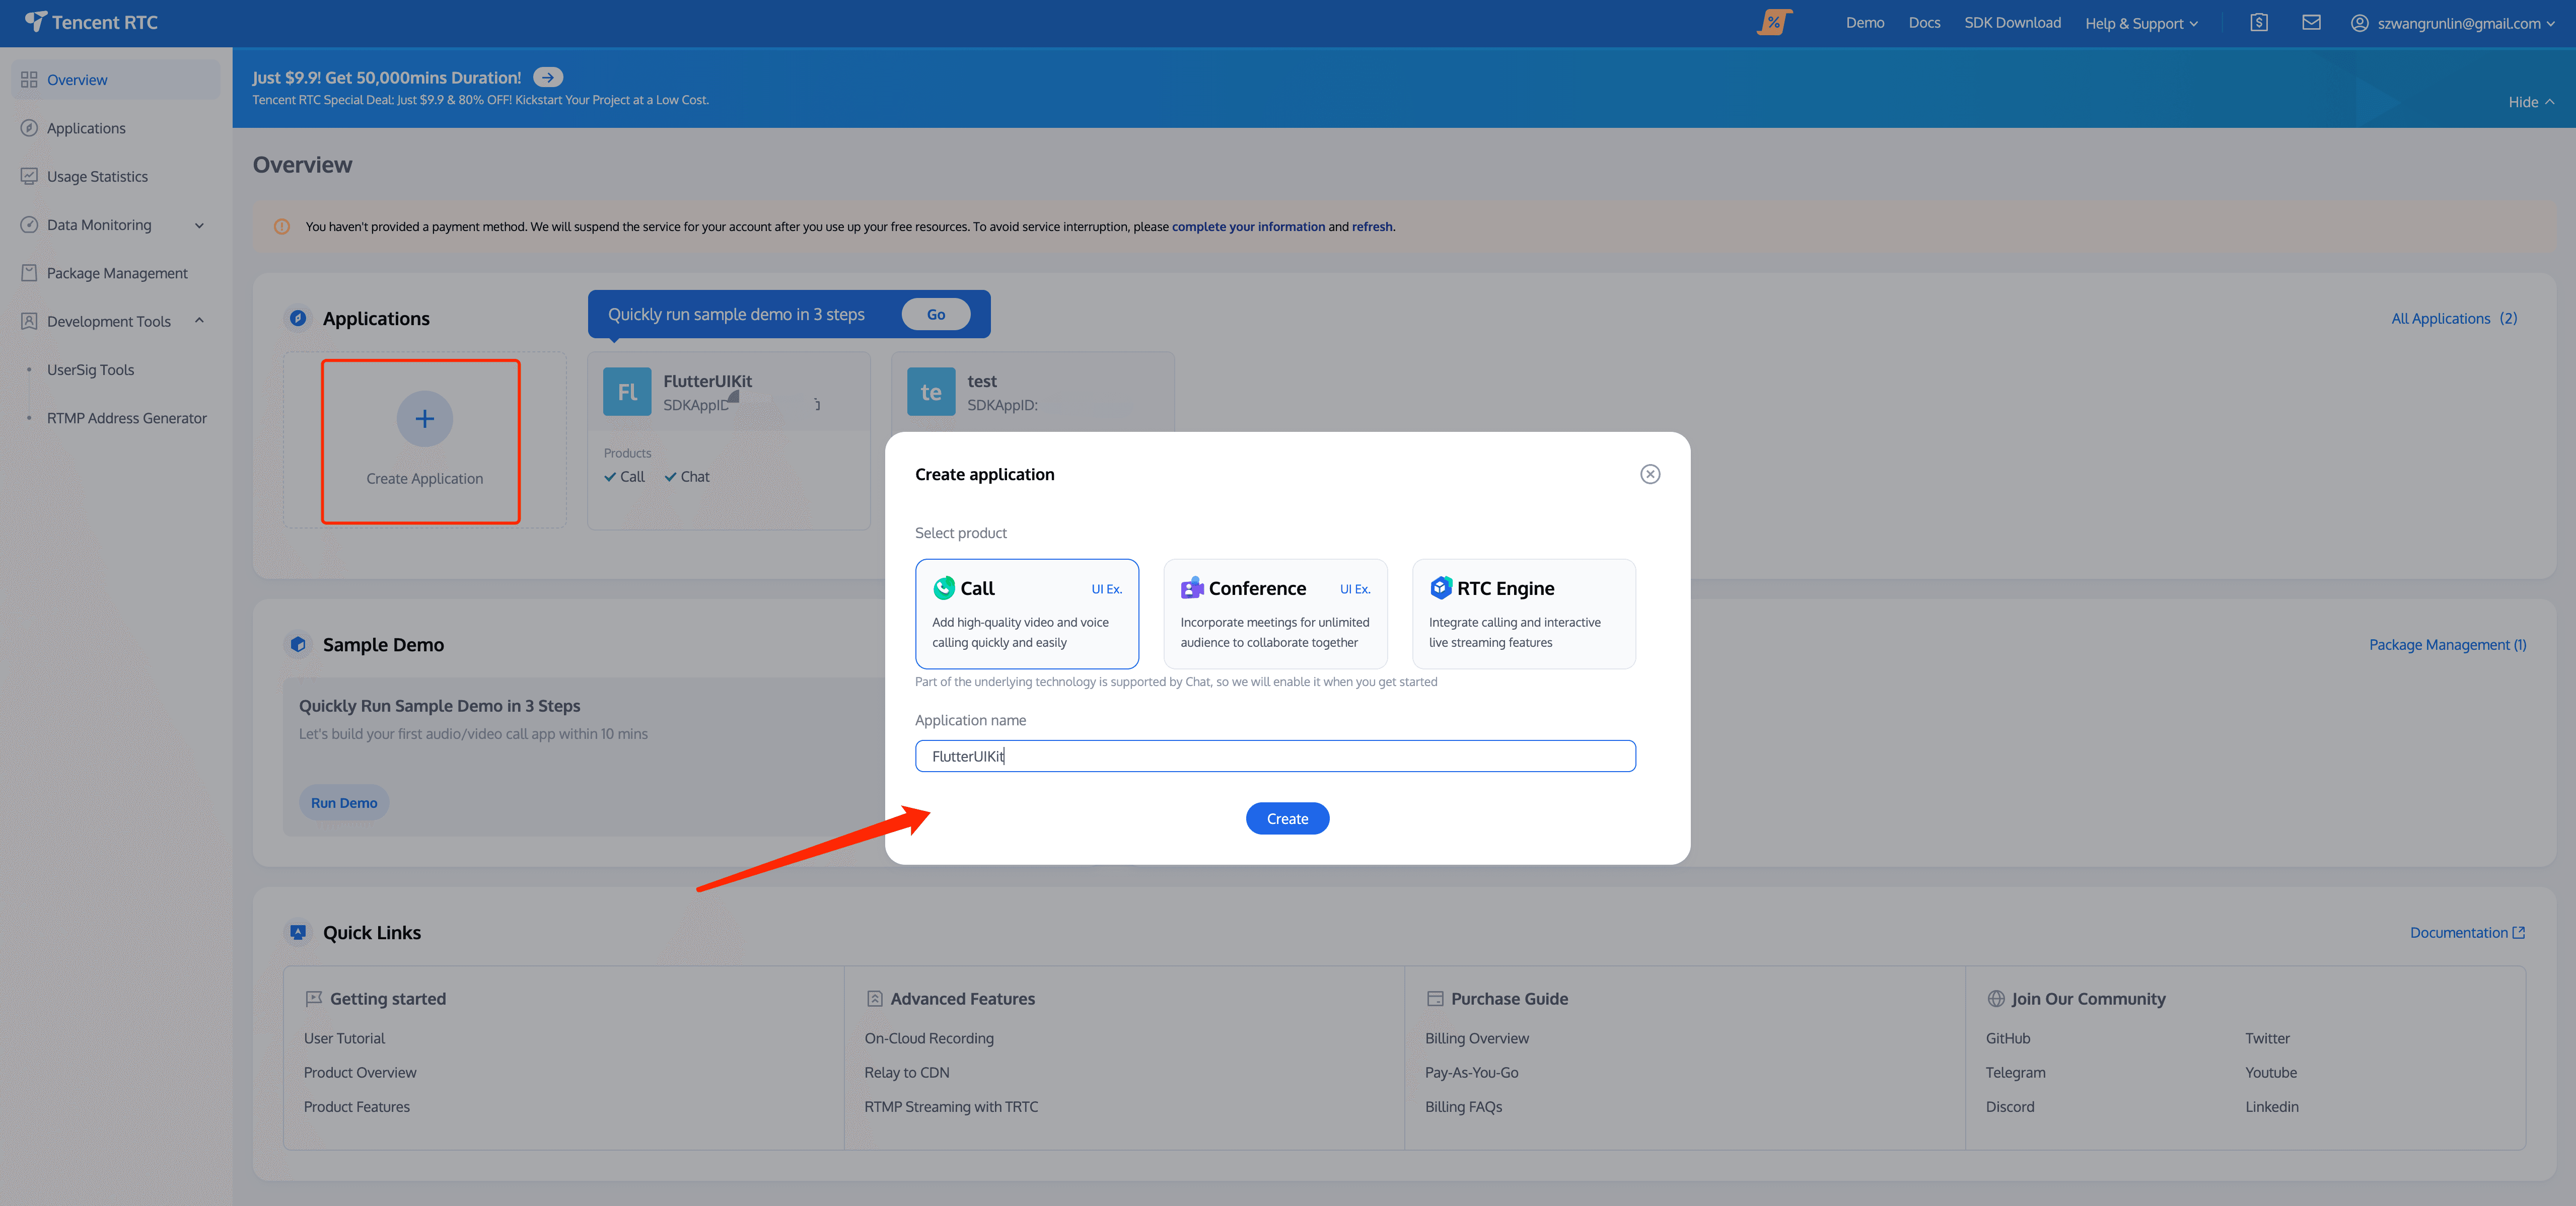
Step 1. Create an Account: Visit the Console of trtc.io and create an account by following the prompts.
Step 2. Start a Free Trial: Create an application on the homepage and start your free trial.
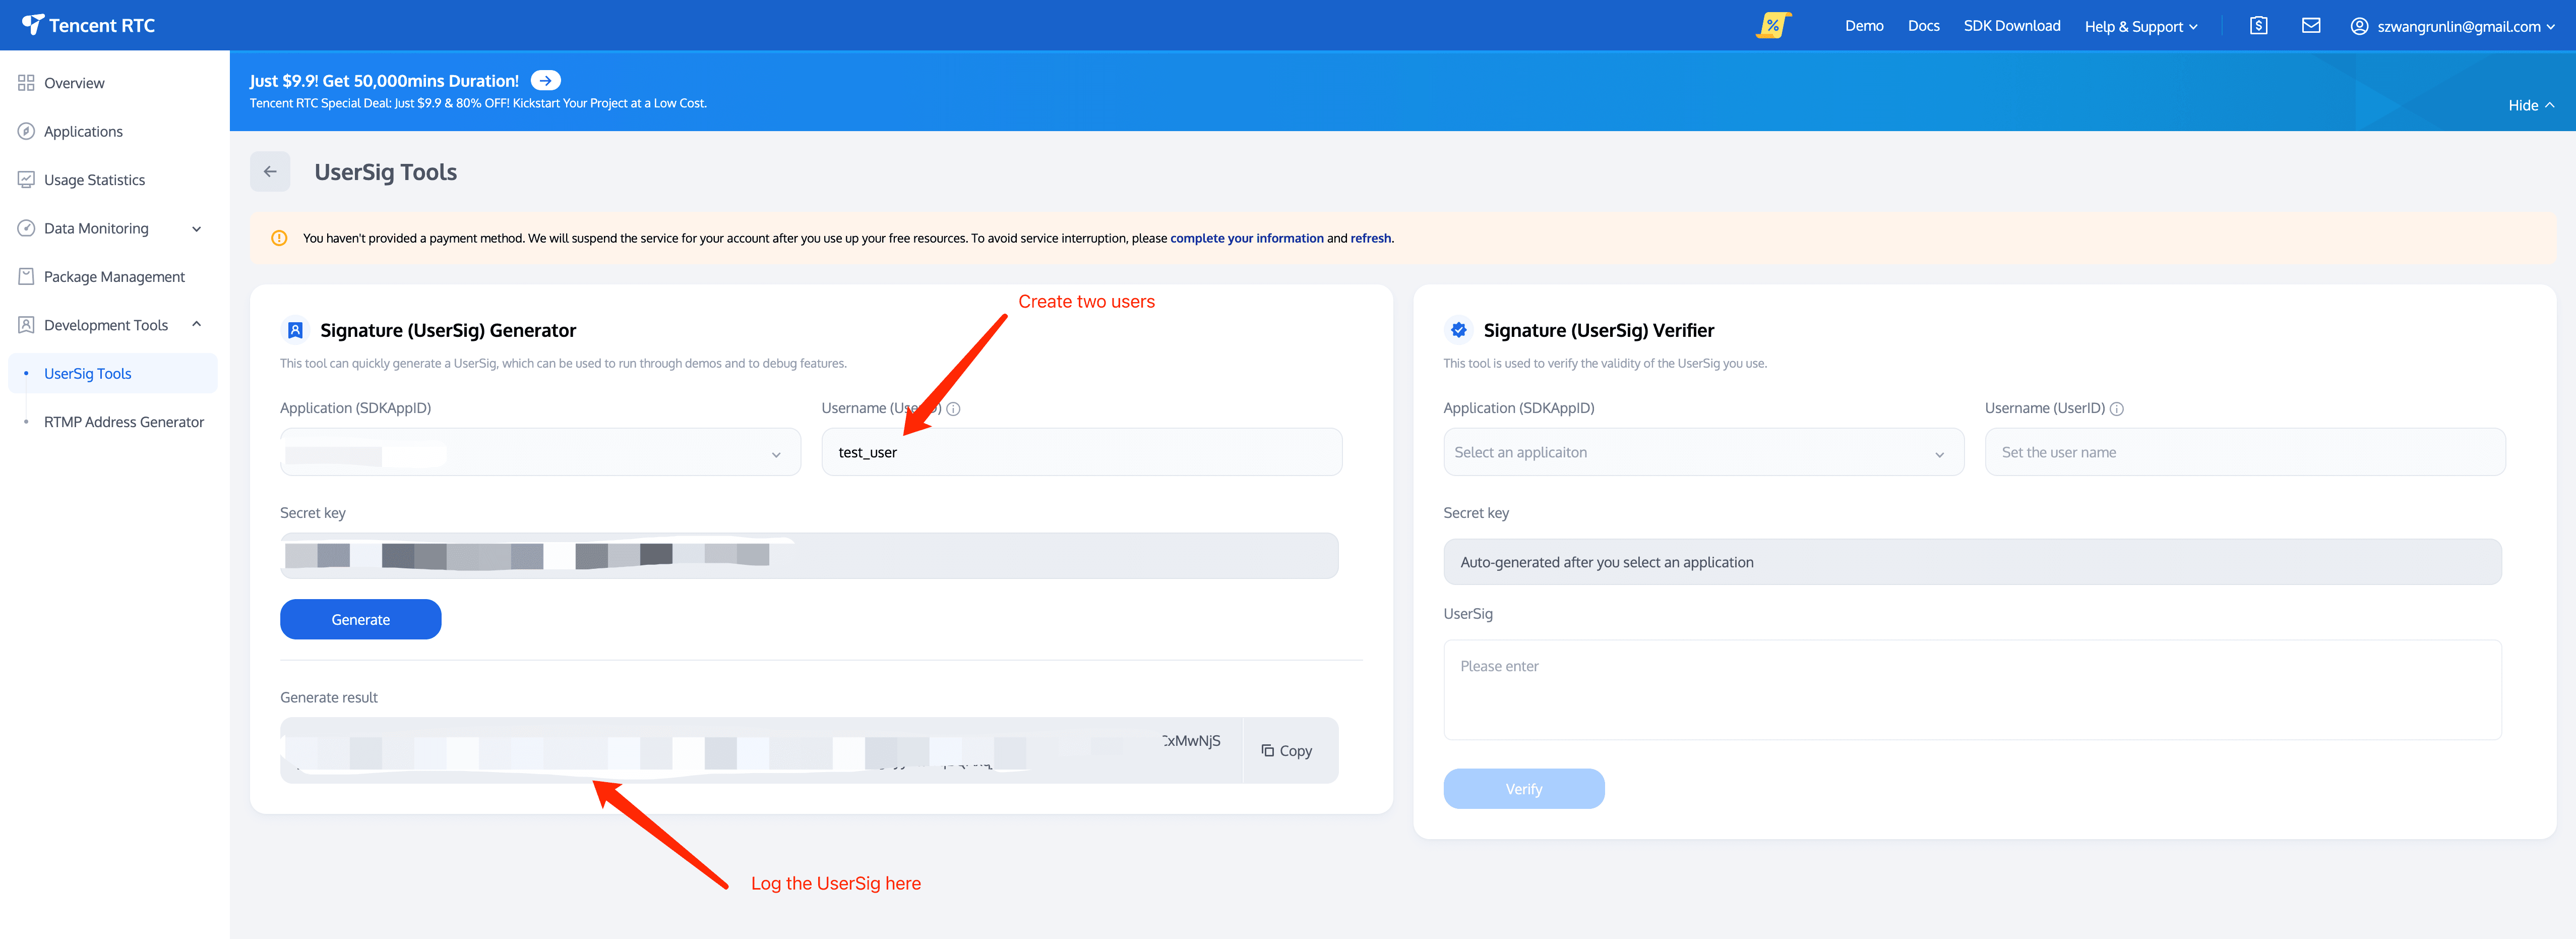
Step 3. Generate Test Users: Create two users (test accounts) on Account Management. Following by use the UserSig Tools to create the corresponding UserSigs for them, note down the UserSigs for later use.
Step 4. Retrieve Your SDKAppID: Go to Applications, select your newly created application, and navigate to the corresponding Application Overview to find your SDKAppID.
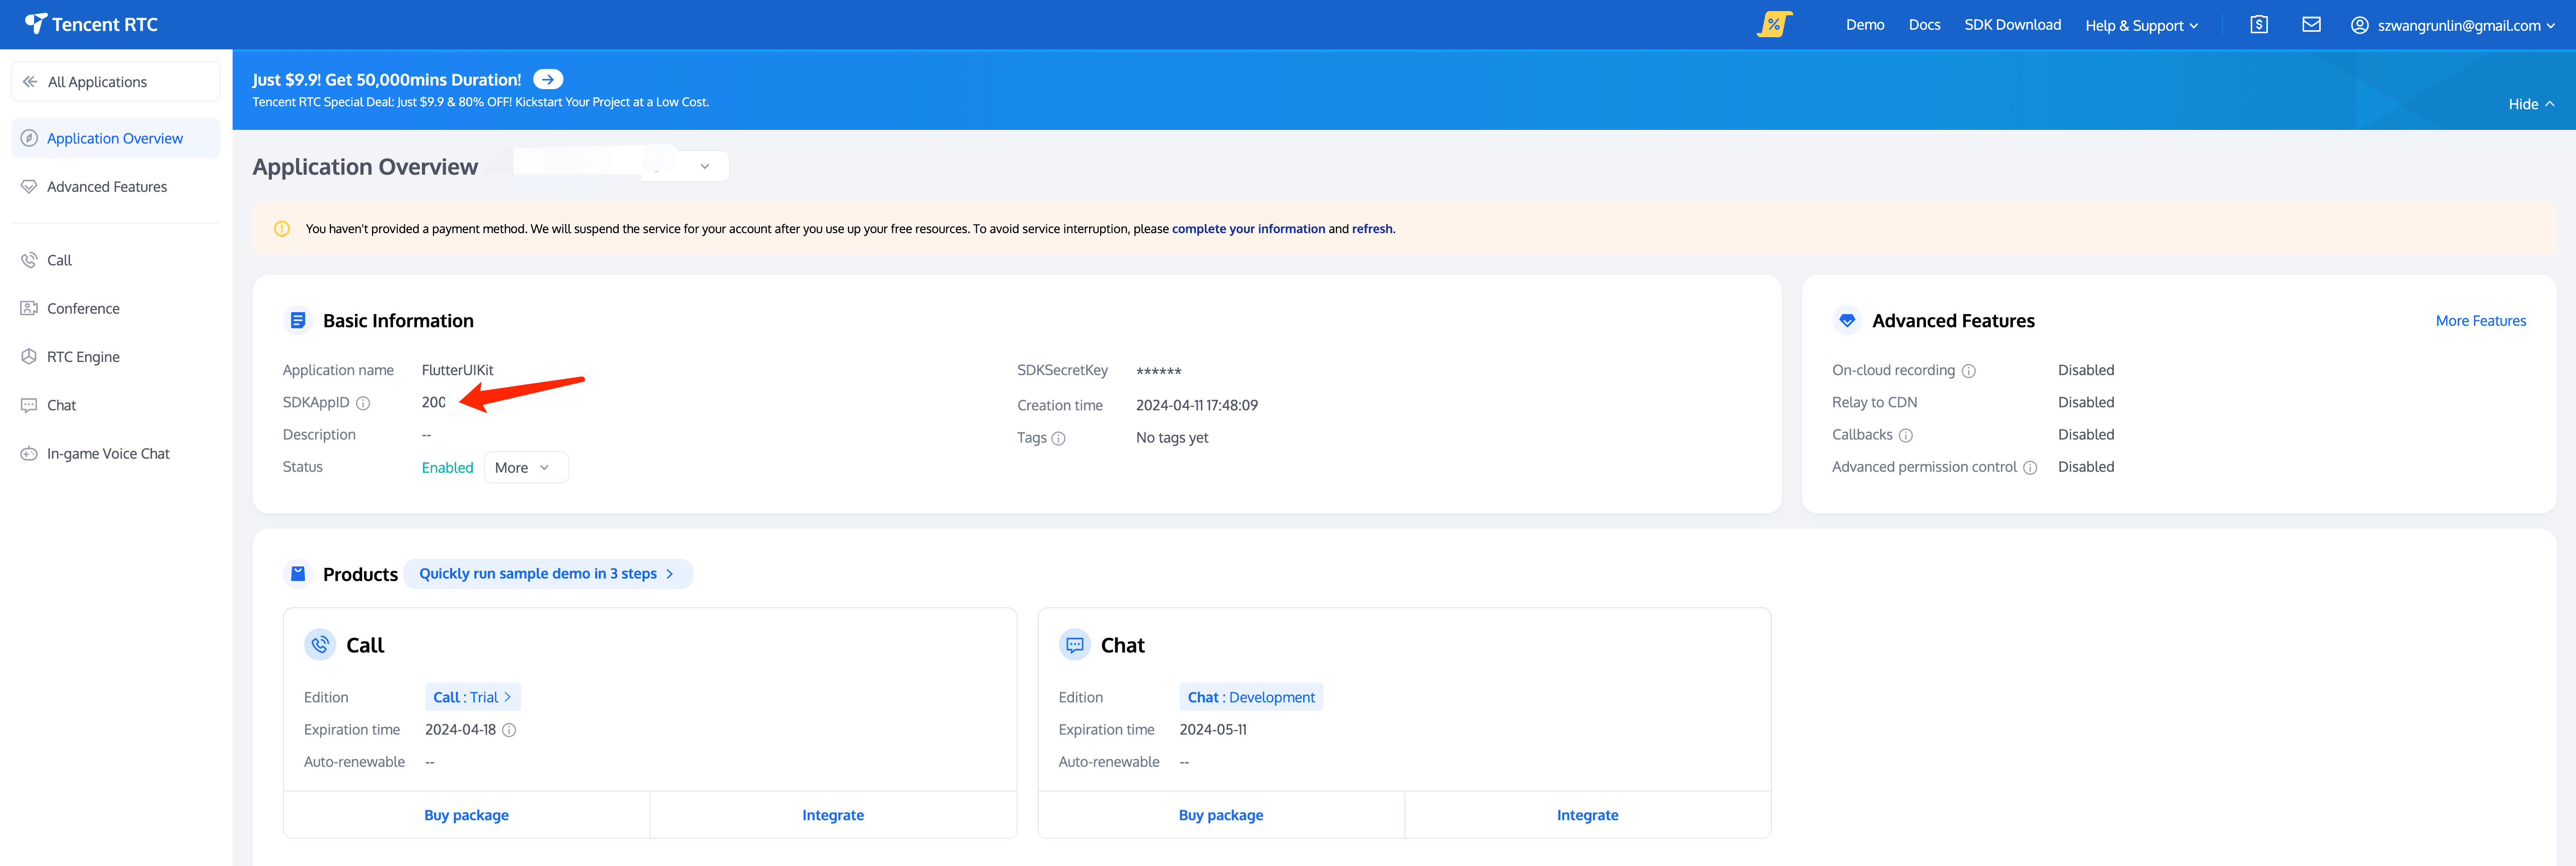
At this point, the Console setup is complete. Make sure to note down the SDKAppID and the two sets of UserID and UserSig.
Quickly Integrate with Flutter Chat UIKit
The following steps provide a simplified overview of integrating with our Flutter Chat UIKit. For a detailed integration process, please refer to this guide: Detailed Integration Guide.
To begin, it's best to have a Flutter project ready or create a new one to fully experience this tutorial. We recommend following the steps to create a new Flutter project.
Furthermore, the upcoming steps involve client-side project and code operations. To enhance your understanding, you can refer to the source code of this simplied integration project showcased later, available on GitHub repo.
Note: this source code repo is only for showcasing the simplifed integration purpose, for the following tutorial.
If you're interested in exploring a fully-fledged app with an extensive range of features, advanced capabilities, and customization options, please check out This Repo.
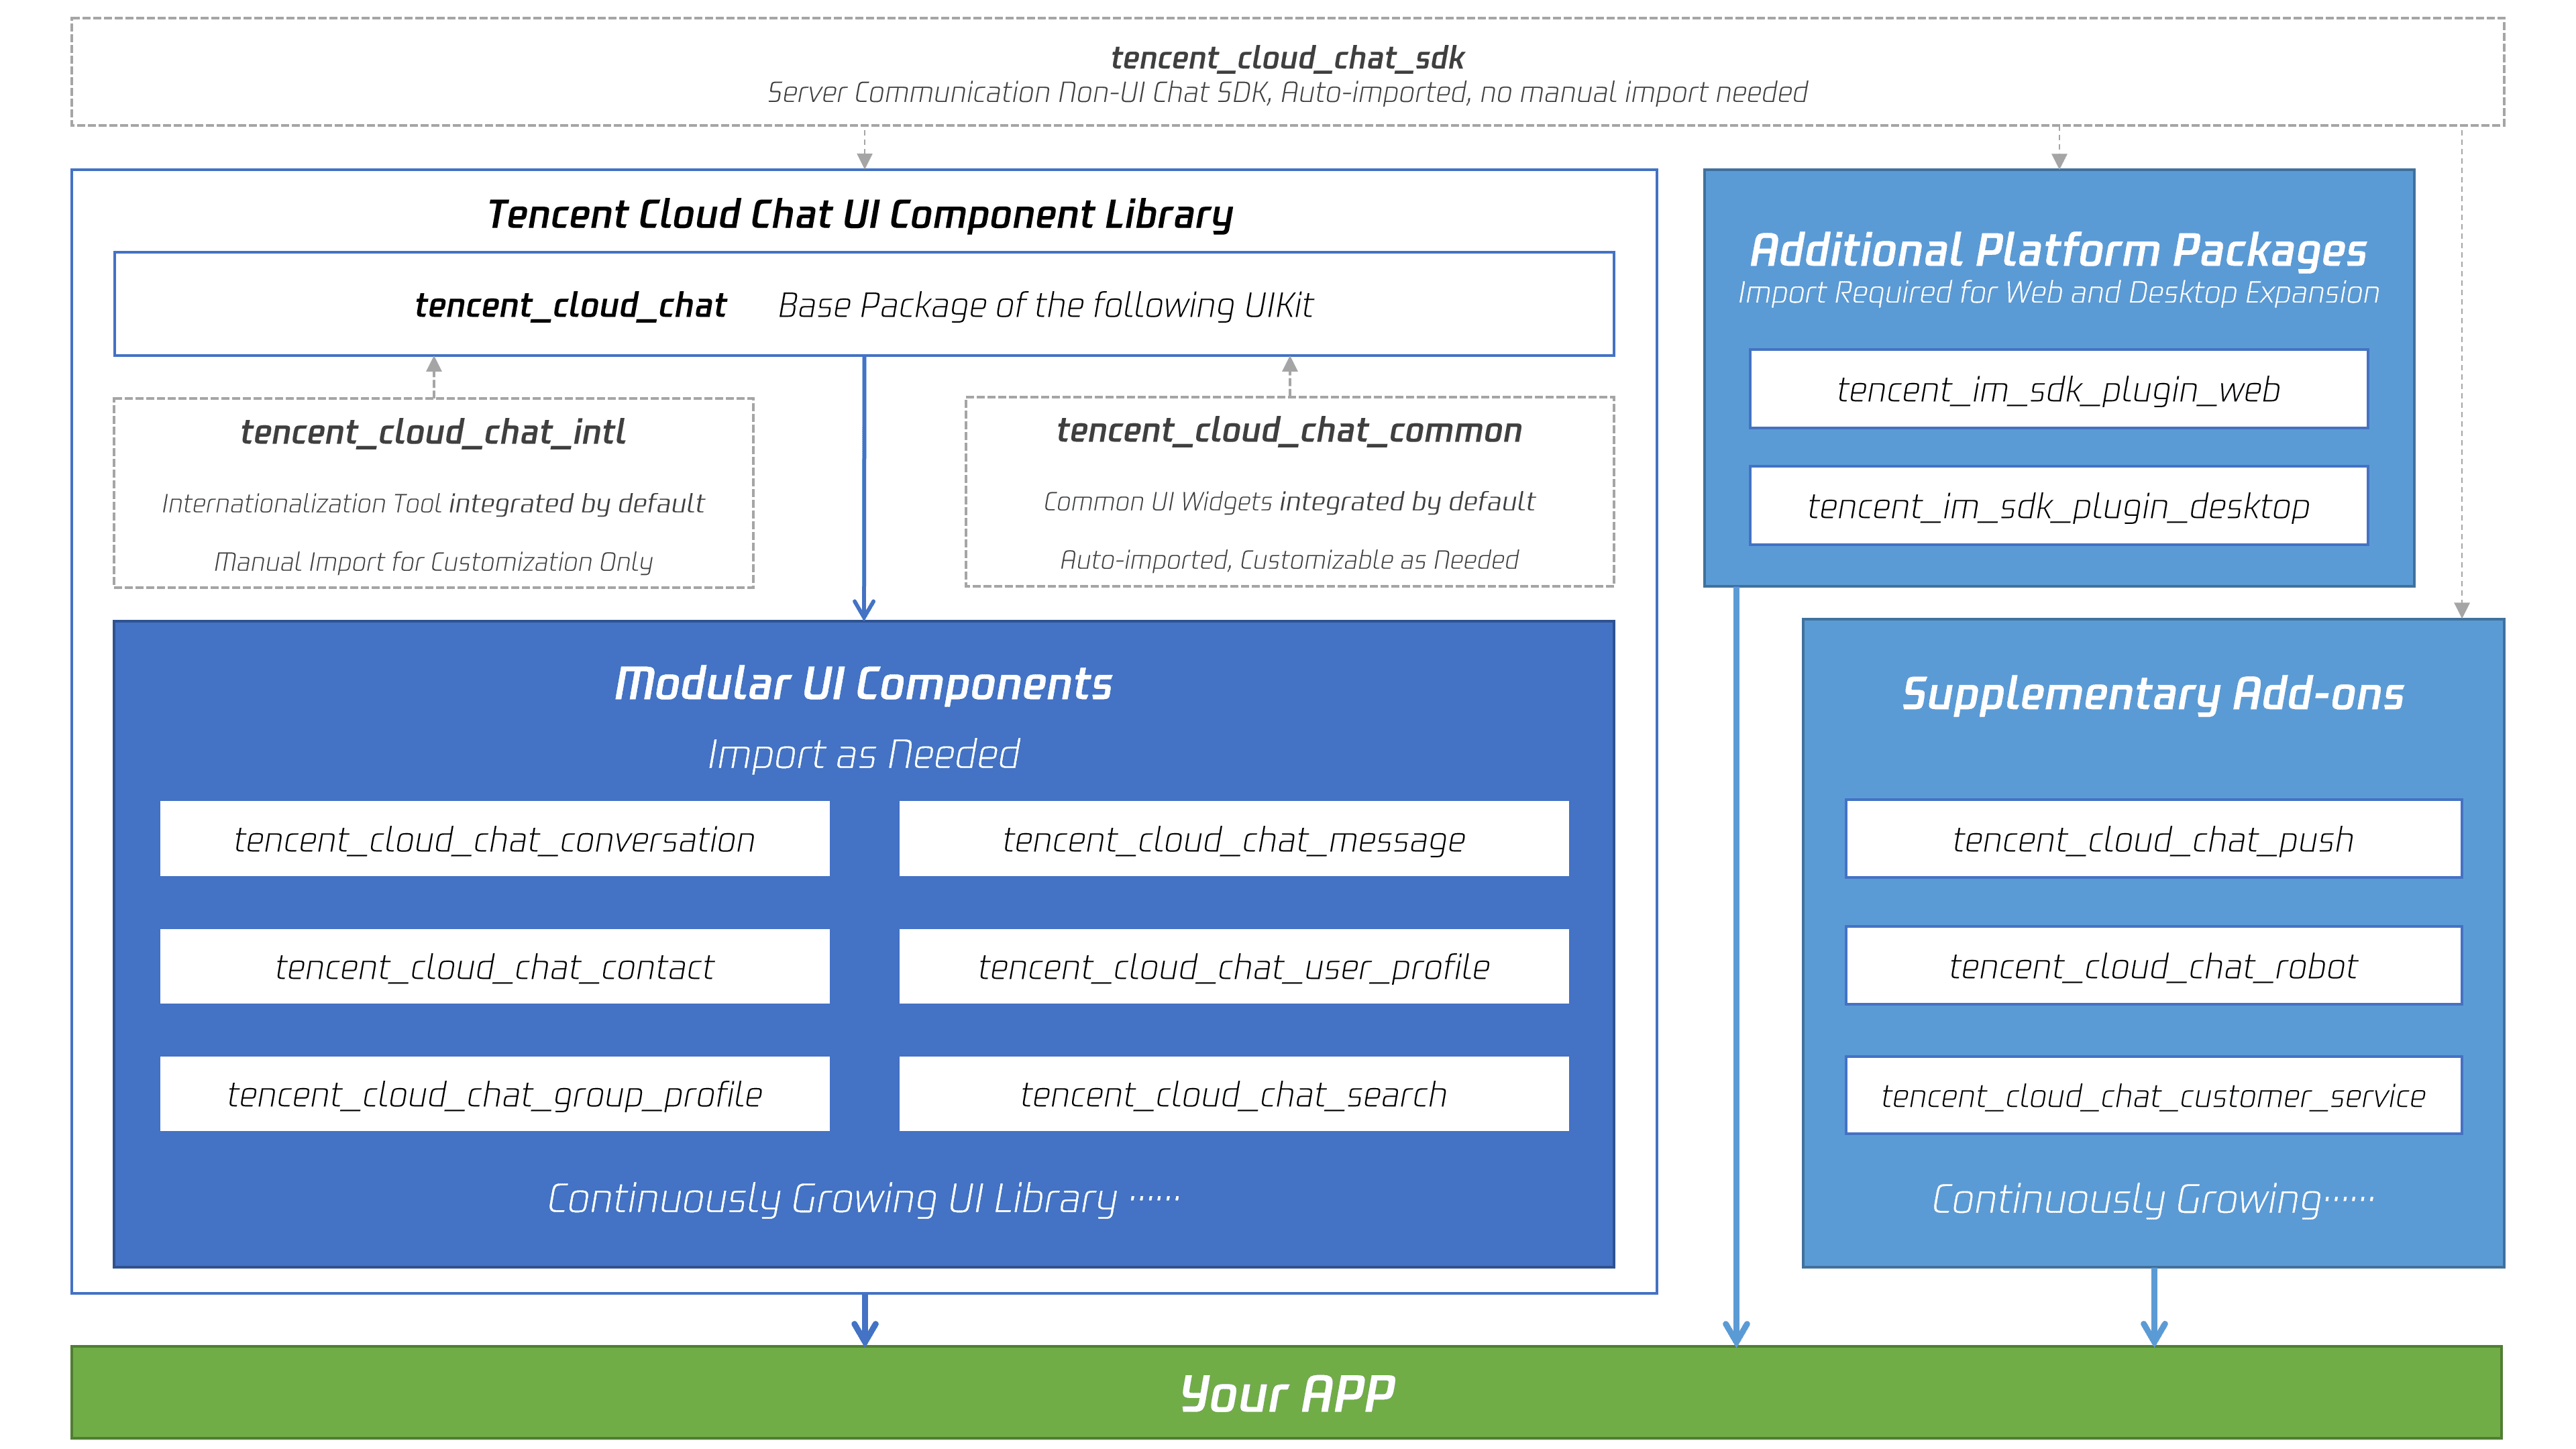
Step 1. Import the Packages
To get started, import the base package, `tencent_cloud_chat`.
```shell
flutter pub add tencent_cloud_chat
```
Next, import the UI component packages that suit your needs:
```shell
flutter pub add tencent_cloud_chat_message
flutter pub add tencent_cloud_chat_conversation
flutter pub add tencent_cloud_chat_contact
flutter pub add tencent_cloud_chat_user_profile
flutter pub add tencent_cloud_chat_group_profile
```
For demonstration purposes, we suggest importing all of them. However, in real-world projects, you can import packages based on your specific requirements.
Step 2. Initial Setup for UIKit
Before you start using each Modular Package UI component, follow these initial setup steps:
- Global Configuration:
Replace your project's `MaterialApp` by `TencentCloudChatMaterialApp`.
This enables automatic management and configuration of language, theme (with material3), theme mode, and other settings. If you prefer manual configuration, refer to Implement the global configuration for UIKit manually.
- Initialization and Login
Call `TencentCloudChat.controller.initUIKit` to initialize and log in.
Pass in the `sdkAppID`, `userID`, and `userSig` of your Tencent Cloud Chat application. Also, declare the register of each sub Modular UI Package in the `usedComponentsRegister` list.
TencentCloudChat.controller.initUIKit(
  options: const TencentCloudChatInitOptions(
    sdkAppID: , /// [Required]: The SDKAppID of your Tencent Cloud Chat application
    userID: , /// [Required]: The userID of the logged-in user
    userSig: , /// [Required]: The userSig of the logged-in user
  ),
  components: const TencentCloudChatInitComponentsRelated( /// [Required]: The modular UI components related settings, taking effects on a global scale.
    usedComponentsRegister: [
      /// [Required]: List of registration functions for the components used in the Chat UIKit.
          TencentCloudChatConversationManager.register,
          TencentCloudChatMessageManager.register,
          TencentCloudChatUserProfileManager.register,
          TencentCloudChatGroupProfileManager.register,
          TencentCloudChatContactManager.register,
      ],
  ),
);
Perfect! With the global configuration complete, we're now ready to dive into the usage of our Modular UI Components. Let's explore how they can enhance your chat application experience.
Step3. Integrating Modular UI Components
In most use cases, you'll need to manually instantiate and add the `TencentCloudChatConversation` and `TencentCloudChatContact` components to a widget, if necessary.
Other components are automatically navigated based on user actions.
In this tutorial, we'll use the `bottomNavigationBar` to manage the pages and switch between the `TencentCloudChatConversation` and `TencentCloudChatContact` components.
First, declare a `currentIndex` variable and a `List<Widget> pages` array to indicate the currently selected component and store the component instances.
 List<Widget> pages = [];
 int currentIndex = 0;
Store the instances in the `pages` array.
pages = [
     const TencentCloudChatConversation(),
     const TencentCloudChatContact(),
   ];
Finally, modify the `build` method as follows:
 @override
 Widget build(BuildContext context) {
   return Scaffold(
     bottomNavigationBar: BottomNavigationBar(
       type: BottomNavigationBarType.fixed,
       currentIndex: currentIndex,
       onTap: (index) async {
         if (index != currentIndex) {
           setState(
                 () {
               currentIndex = index;
             },
           );
         }
       },
       items: const [
         BottomNavigationBarItem(
             icon: Icon(Icons.chat_bubble_outline), label: "Chats"),
         BottomNavigationBarItem(
             icon: Icon(Icons.contacts), label: "Contacts"),
       ],
     ),
     body: pages[currentIndex],
   );
 }
And that's it! You've successfully integrated the components.
Looking back, you can see that the simplified integration code on GitHub repo.
Step 4. Experience the Flutter Chat UIKit in Action
Now, let's run the project and experience the Flutter Chat UIKit.
Log in with the first test account created in the `initUIKit` method and launch the app.
Start by running `flutter run`.
Note: If you encounter issues with iOS not running or Android SDK version mismatch, please refer to our sample app repo and choose the appropriate version configuration.
Once you've successfully entered the app, you'll see the Conversation and Contact pages, with the ability to switch between them at the bottom.
However, there are no conversations to test yet.
Don't worry! Switch to the Contacts page, click 'Add Contact' in the top-right corner, and add the other test account as a contact. You'll now see the other account in the Contacts list.
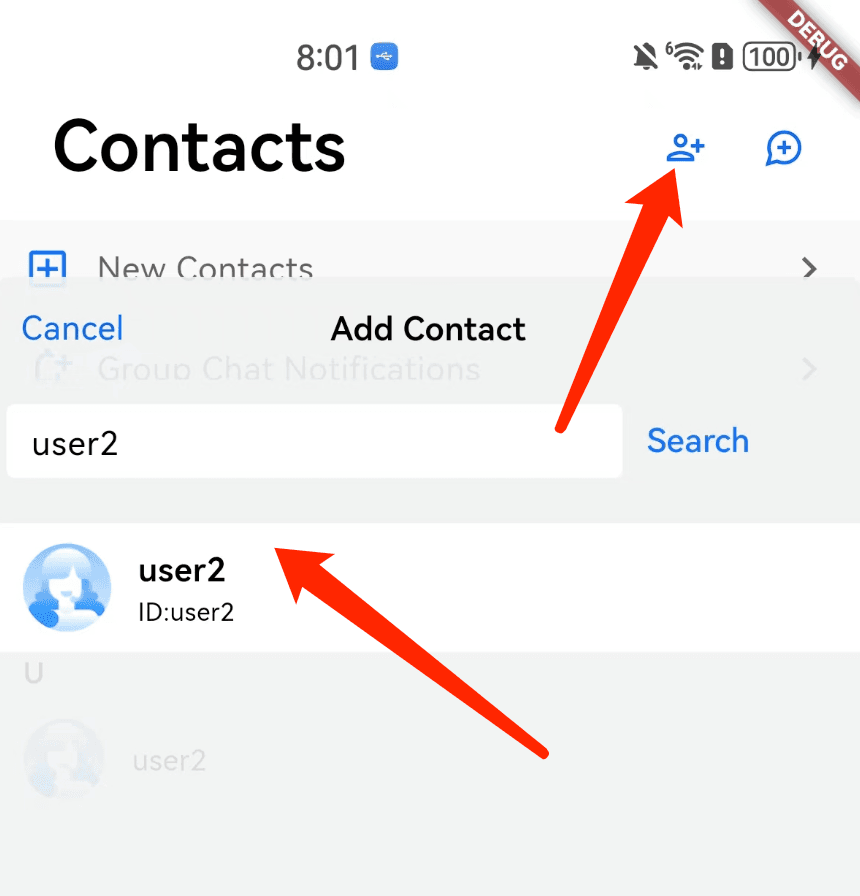
Click on the contact to start chatting.
You can also rerun the app, log in with the other user's UserID, and experience sending messages to each other.
In conclusion, we've now completed the entire simplified integration process. Thank you for experiencing the power of Tencent Cloud Flutter Chat UIKit.
For more information on detailed integration, configuration, and advanced usage, please refer to this guide: Detailed Integration Guide.
If you have any questions or need assistance online, our support team is always ready to help. Please feel free to contact us or join us on Telegram. Happy coding!